Tuesday, September 28, 2010

How to Build a Nook emulator

due to nookdevs isn't accessible, I make a copy of their document about how to build nook emulator here. Also, I shared my system.img for nook at the end this post as well.

Android Emulator for the Nook

It is very possible to run the Barnes and Noble Nook firmware in the Android Emulator. It is time to start developing some Google Android Apps for it.
Instructions for Unix/Linux

In order to do this, you will need to:
  1. Download the Android SDK and install it. Install the Platform 1.5 SDK using tools/android in the Android SDK.
  2. Grab the original 1.0.0 image from bn.com (mirrored here: multiupload).
  3. Run dd if=signed_bravo_update.1.0.0.dat of=signed-bravo-update.1.0.0.tar.gz bs=1 skip=152 (On Windows use this tool. At the command line run gzip-extract signed-bravo-update.1.0.0.tar.gz bravo_update.dat. NOTE: gzip-extract requires the .net framework. Afterwards rename bravo_update.dat to signed-bravo-update.1.0.0.tar.gz)
  4. Extract signed-bravo-update.1.0.0.tar.gz.
  5. Rename bravo_update.dat to bravo_update.tar.gz and extract it.
  6. Extract root.tgz.
  7. Extract root/system/framework/services.jar with your favorite unzip utility.
  8. Download and install smali. You need at least baksmali-1.1.jar and smali-1.1.jar. For your sanity, grab the wrapper scripts as well.
  9. Run baksmali classes.dex on the classes.dex from services.jar to disassemble services.jar
  10. Edit out/com/android/server/ServerThread.smali and remove the line if-lt v0, v1, :cond_483 This should be line 966. (In version 1.0.0)
  11. Run smali out/ to re-assemble classes.dex with our fixes.
  12. Rename out.dex to classes.dex and copy this classes.dex to services directory, overwriting the original classes.dex.
  13. Delete the out directory and re-jar the services directory.
  14. Make an Android Device (AVD entry) in the Android Emulator with target platform 1.5 and skin/screen size of 549 by 924 (real resolution is more like 600x944 but the emulator won't start at that size), name it nook (case sensitive).
    1. If you are unable to create the AVDs (something like Error: Ignoring platform 'google_apis-3-r03': build.prop is missing. ) then install Eclipse, install the Android plugins for Eclipse and you will be able to create the AVDs from there.
  15. grab lib/libaudioflinger.so from stock system.img supplied with Android SDK using unix utility unyaffs to extract the file
  16. overwrite the libaudioflinger.so from the system/lib directory in the nook firmware with the stock Android SDK one.
  17. use mkyaffs2image to make a system.img of the system/ of the nook firmware.
  18. rename system.img in the 1.5 firmware platform folder to system.good and copy in replacement system.img file you just created (it will be bigger than the SDK Android system.img (approximately 108Mb)
  19. Run the emulator by using command line emulator @nook -shell -show-kernel -verbose The emulator will take a few minutes to boot.
  20. You will NOT be able to register your emulated Nook with BN.com but you can sideload epub books but placing them in system/media/guides when you create your replacement system.img file mentioned in step 17.


References:
http://denverdroid.blogspot.com/2010/05/how-to-build-nook-emulator.html (in detailed steps)
http://code.google.com/p/nookdevs/ (nookdevs project repository)
http://code.google.com/p/rxwen-blog-stuff/downloads/detail?name=nook_1.0.0_system.img.zip&can=2&q=  (image for downloading)

how to soft-root your nook

I don't know for what reason, the nookdevs.com isn't accessible. So I made a copy of their document about how to soft-root nook here:


How to soft-root your Nook

Thanks to nookdevs.com for rooting the device. Guideline provided by nookdevs.com.


What is soft-rooting?
The softroot is a way to enable the ADB without disassembling nook to gain root shell access on both 3g-equipped (original) and WiFi-only nooks (thanks to muchadoaboutnoth from IRC for confirming that). If you don't know what that means, you probably DO NOT want to run this updater on your nook. As of today, the nook's adb runs over WiFi, you can enable ADB over USB however. Read more on benefits and disadvantages of rooting and why rooting matters.


WARNING
While we've taken great pains to make sure that this script won't damage your expensive new eBook reader, it comes with ABSOLUTELY NO WARRANTY. To date, it has been tested on nooks running 1.0.0, 1.1.0, 1.1.1, 1.2, 1.3 and 1.4 of the nook firmware on both the 3g-equipped (original) and WiFi-only nooks (thanks to muchadoaboutnoth from IRC for confirming that). If it breaks, you get to keep both pieces. In the unlikely event that you run this script and end up with a paperweight, please join us on #nookdevs (alternatively thru webchat) on irc.freenode.net and we'll see what we can do.

Once you run a third-party software updater on your nook, Barnes & Noble may consider your warranty null and void. It's sort of like strapping a rocket engine to your Civic -- If you hit the side of a mountain at 300mph, it's just not Honda's fault.

If you run this updater and your nook appears to have become a (very expensive) paperweight, DO NOT CALL BARNES & NOBLE. Join us on IRC and we'll do our best to help sort you out.

Barnes & Noble have built a really fantastic Android tablet for us. So far, it looks like it's going to be an amazing platform for third-party experimentation and development. To make sure that that stays true, there are some things you should keep in mind:
  • 3G is for B&N resources only, if you truly think you spent $259 $199 for unlimited 3G for life, you're delusional. You can, however, use your own SIM-card for browsing thru 3G on a softrooted nook.
  • A number of nook owners have asked us about the nook's DRM. Don't steal books.

If we haven't scared you off, it's time to get your new rocket engine set up.


A word about 1.4 update
The instructions below will help you downgrade to 1.0.0 (which will wipe your nook settings clean) and then upgrade to the 1.4 update with the pre-installed softRoot + nookLauncher + nookLibrary + nookWifiLocker + Trook + VNC + busybox (update file courtesy of perfinion and poutine; the apps are by kbs, hari and hazymind). This streamlined rooted update retains the turboboot/uboot as is, so you will not have to downgrade prior to upgrading to rooted images in the future.

If you have already updated to the stock 1.4 (either manually or via OTA update), you can still softroot your nook following the same steps below (you will however lose your settings when you downgrade to 1.0.0).

If you currently have a nook with 1.1.1 B&N software or 1.2/1.3 softRoot software, you can skip the section about downgrading to 1.0 again and go directly to the How do I do it? section to upgrade to the rooted 1.4. You should not lose any settings during the update.

IMPORTANT: You will need to REBOOT after you get to the nook "home screen" on the first initial boot!

Known issues with softRooted 1.4 update:
  • WiFi Lock might not work
IMPORTANT: You will need to REBOOT after you get to the nook "home screen" on the first initial boot!


Pre-requisites
  • You need a B&N nook.
  • You need a 128MB-or-higher microSD card with a single, FAT32-formatted partition.
  • You need to download the rooted 1.4 update (do not forget to rename file to bravo_update.dat):
  • Full softRoot (root/ADB + apps) download(SHA1 hash: 5a62a2a3ad4ffa5ea6fe2c93ebe241ead5376cd0)
  • You'll also need the 1.0.0 image download(you won't need this if you have softrooted/streamlined 1.2 or 1.3 on your nook).
  • MD5 hash: c752fa57f7253d4c499398630c27bdab
  • SHA-1 hash: 84287d73b70e98da6a6af9f362b31e96d4e6eea4
  • SHA-256 hash: a22bbbf1cc61a81fd812abc5b75f5c713cab3471be36219897 aeb91b26405b35
  • You won't need any tools or a clean work surface. Unlike our initial efforts, this tool is a simple software updater. There's no need to crack your nook open.
  • Should you want to use older version of the nook software, you can download one of the obsolete versions.
  • Attention Chrome users: if instead of the bravo_update.dat and signed_bravo_update.dat you end up with bravo_update.dat.zip and signed_bravo_update.dat.zip accordingly, DO NOT UNZIP these files, you will just need to rename them to bravo_update.dat and signed_bravo_update.dat.

How do I do it?
Here is an overview of the process you'll go through. These are not step-by-step instructions. This is only an overview. Follow the instructions in the following sections.

  1. Back up any files on your nook, as it WILL be erased during this process.
  2. Manually install nook software 1.0.0 (downgrade)
  3. Manually install modified nook 1.4 software (upgrade & root)
  4. Use the Android Debug Bridge to access your nook's root shell over Wi-Fi.
  5. If you already have softrooted 1.2 or 1.3 update on your nook, you just need to apply softrooted 1.4 update, no need to downgrade to 1.0.0 first.


Step 1: Prepping your nook (downgrade to 1.0.0)
You only need to do this if you have applied the B&N 1.2, 1.3 or 1.4 update. If you are currently running softrooted/streamlined 1.2 or 1.3 by poutine, skip this section.
  1. Make sure your nook has sufficient battery to complete the procedure without turning off (at least 20%).
  2. BACK UP ANY FILES ON YOUR NOOK. This bears repeating: you WILL lose your data if you do not.
  3. Download the original nook 1.0.0 software image (see the Pre-requisites section).
  4. Rename the file you downloaded, if necessary, to signed_bravo_update.dat.
  5. If you haven't already, connect your nook to your computer via USB. The "nook" drive should appear—this is your nook's internal microSD card.
  6. Copy the 'signed_bravo_update.dat' file to the "nook" drive.
  7. Eject/unmount the "nook" drive. Remove USB cable. (Note: The B&N Home screen should show some indication that it's unpacking and checking the update after this step)
  8. The update procedure should begin automatically—look at the lower-right corner of your nook's e-ink screen and there should be a small box that says "Preparing update" with a percent-complete indicator.
  9. DO NOT turn off the power during this procedure. The nook will reboot itself when it is done.


Step 2: Rooting your nook (upgrade to modified 1.4)
Warning: This process requires that you are running the original bootloader (nook 1.0.0 software). Odds are that unless you followed the directions in Step 1: Prepping your nook above, you probably aren't. In order to get the original bootloader installed, downgrade to the full 1.0.0 image via sideloading as explained above before proceeding with the softroot.
  1. Make sure your nook has sufficient battery to complete the procedure without turning off (at least 20%).
  2. Download the rooted nook 1.4 software (see the Pre-requisites section).
  3. If you haven't already, insert a microSD card in your nook (see Inserting extra storage in your nook if you need help with that).
  4. Plug your nook into your computer via USB. You should see two drives appear: a "nook" drive (this is your nook's pre-installed, internal drive) and one more.
  5. Unlike in Step 1, you are going to use the second drive, not your nook's internal drive (the one named "nook").
  6. Copy the file you downloaded, which should be named "bravo_update.dat", to the nook's external drive identified in the previous step.
  7. Eject/unmount both drives: the one for your external card, and the internal "nook" drive.
  8. Unplug your nook from your computer.
  9. Turn off your nook by holding in the sleep/power button on top until the screen turns blank.
  10. Press and hold the upper page-flip button on the right-hand side of your nook (the one marked with a < pointing towards the middle of the e-ink screen).
  11. While continuing to hold the page-flip button, press and release sleep/power button on top. Don't let go of the page-flip button.
  12. Continue holding the page-flip button until the e-ink screen displays a "checking for update" message. Release the page-flip button within a couple seconds of when you see this message.
  13. Timing is key. If your nook displays the typical "Starting Up" screen, you've missed it—wait until it starts up, then turn it off and try again.
  14. Wait for your nook to finish running the updater (the touchscreen will show the progress).
  15. Wait for your nook to fully start up after successful update, and then manually reboot it (hold the power button for about 5 seconds so that both screens shut down and then start your nook again).
  16. It is very important, so I repeat again: Wait for your nook to fully start up after successful update, and then manually reboot it (hold the power button for about 5 seconds so that both screens shut down and then start your nook again). It is very important to reboot after an update!
  17. That's it! You've rooted your nook.
You can delete the bravo_update.dat file from your nook's external card; you no longer need it.


Step 3: Getting a root shell with the Android Debug Bridge
How to use your newly-rooted nook:
  1. Download and install the Android SDK.
  2. Find the IP address of your nook (instructions are here: How to find nook's IP address).
  3. In a terminal (command line) window, navigate to the "tools" directory in the Android SDK.
  4. With the NOOK_IP being the IP address of your nook, enter the following:
  5. adb connect NOOK_IP:5555
  6. Nothing should appear to happen and you will be returned to your command prompt. This is normal.
  7. You can now use the ADB tools to talk to your nook. To get a root shell on the nook, enter:
  8. adb shell
  9. A # should appear — you now have root access to your nook's command line interface!
  10. You can also enable ADB over USB. Complete documentation for the Android Debug Bridge is available here.

Things you may want to do with your newly-liberated nook:

Install native Android applications. See application directory for more information. The modified 1.2 and up full softRoot updates already come with several nifty applications pre-installed.
Develop nook-optimized Android applications. Installing the nook emulator on your computer may be of great use for you then.

Have fun!

Friday, September 24, 2010

recovering GRUB bootloader on windows/ubuntu dual boot machine

I installed both windows and ubuntu on my laptop. It's easy to dual boot because I installed ubuntu after windows. But for some reasons, I have to reinstall windows.
And after windows is installed, dual boot no longer work because windows installer overwrited the mbr. I didn't want to install ubuntu again, and luckily, I found this: Dual Boot Ubuntu and Windows.
In short, we can fix the grub with following steps:
  1. Boot with ubuntu live cd
  2. Mount the ubuntu installation file system
  3. Reinstall grub with "grub-setup -d ubuntu_installation_path/boot/grub" command

understanding drawBitmapMesh on android

The Canvas.drawBitmapMesh method on android is a like a mystery to me while I looked at the BitmapMesh sample. Though I tried to get some hints from the official document, it didn't help much. After played it with several tests, I got some ideas about how it worked.

A metaphor

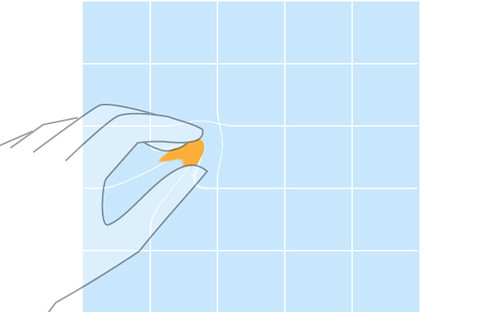
The effect of drawBitmapMesh can be thought as pinching a point of an elastic canvas, and pull it to another point. The distorted image is very similar to what we shall get through drawBitmapMesh. Like the figures below show.


How the mesh affects the bitmap
The bitmap to be drawn is divided into equal size blocks. And the division is defined by the mesh, which is a float array. The array defines the lines that divide the bitmap. To have a division of W*H blocks, there needs to be (W+1)*(H+1) lines. These lines intersect at (W+1)*(H+1) points. Every two consecutive elements in the array corresponds to the x coordinate and y coordinate of an intersection. So, the mesh array comprises of 2*(W+1)*(H*1) elements. Given the bitmap's size is known, the drawing engine can find out the x and y coordinates of intersections by dividing the width or height of the image to W or H, respectively. So, if the x and y coordinates of an intersection supplied in the mesh doesn't equal to its intact values, the drawing engine will "pinch and pull" the intersection from its original location to the location we define.
Keep in mind that for a intersection that deviates its original location, only those four blocks that around it will be affected. All other blocks that are more than one blocks away from the intersection will remain intact.

Sunday, August 29, 2010

avoid designing by coding

I found a obvious, stupid mistake in my c++ code. The mistake itself is trivial and doesn't worth mentioning. What I'm interested in is what lead me to making such a mistake that a very fresh c++ learner can easily recognize.
The main reason is I was designing by coding (implementing). Designing and coding are very separate tasks in a programming project. The goal of designing is to find out an effective way of organizing our code (classes, modules, layers, etc.) so that the code is easy to understand, maintain and to be changed. The goal of coding is implementing required features based on design. Because designing and coding have different goals, there are different ways to do them. But I chose to do them simultaneously, that is, thought about the design and wrote code immediately, even before I had a clear idea of the whole design. In this way, I always didn't have a sole goal in mind, but had to think about multiple things. It's not natural for human brain to work this way. Especially considering the complexity of c++ language, if we can't fully focus on the implementation details, we are very likely to be bitten by it. The case might be less painful if we work with other languages like c#, python, which have much less details to concern. But it's generally wise to choose a more suitable tool to do the design other than coding, for example UML, or other diagrams. And code review is a good way to get rid of such mistakes.

Sunday, August 22, 2010

looper and handler in android

It's widely known that it's illegal to update UI components directly from threads other than main thread in android. This android document (Handling Expensive Operations in the UI Thread) suggests the steps to follow if we need to start a separate thread to do some expensive work and update UI after it's done. The idea is to create a Handler object associated with main thread, and post a Runnable to it at appropriate time. This Runnable will be invoked on the main thread. This mechanism is implemented with Looper and Handler classes.

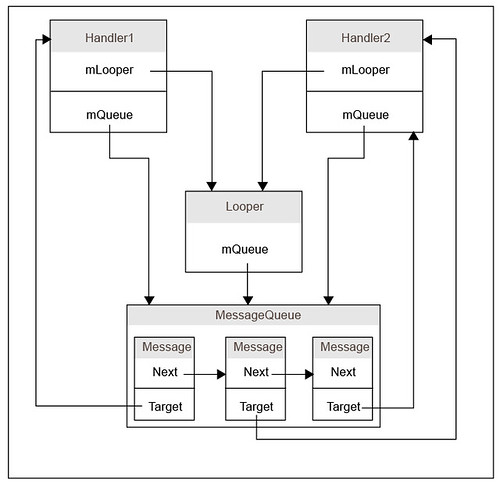
The Looper class maintains a MessageQueue, which contains a list messages. An important character of Looper is that it's associated with the thread within which the Looper is created. This association is kept forever and can't be broken nor changed. Also note that a thread can't be associated with more than one Looper. In order to guarantee this association, Looper is stored in thread-local storage, and it can't be created via its constructor directly. The only way to create it is to call prepare static method on Looper. prepare method first examines ThreadLocal of current thread to make sure that there isn't already a Looper associated with the thread. After the examination, a new Looper is created and saved in ThreadLocal. Having prepared the Looper, we can call loop method on it to check for new messages and have Handler to deal with them.
As the name indicates, the Handler class is mainly responsible for handling (adding, removing, dispatching) messages of current thread's MessageQueue. A Handler instance is also bound to a thread. The binding between Handler and Thread is achieved via Looper and MessageQueue. A Handler is always bound to a Looper, and subsequently bound to the thread associated with the Looper. Unlike Looper, multiple Handler instances can be bound to the same thread. Whenever we call post or any methods alike on the Handler, a new message is added to the associated MessageQueue. The target field of the message is set to current Handler instance. When the Looper received this message, it invokes dispatchMessage on message's target field, so that the message routes back to to the Handler instance to be handled, but on the correct thread.
The relationships between Looper, Handler and MessageQueue is shown below:

This design is very similar to win32's message loop. The benefit of this design is that we no longer need to worry about concurrency issues while manipulating UI elements because they are guaranteed to be manipulated on the same thread. Without this simplicity, our code may bloat heavily because we have to lock access to UI elements whenever they are possibly accessed concurrently.

The example at the end of this post shows how to send messages to different handlers associated with main Looper (Main Looper is created via prepareMainLooper in ActivityThread.main).

Example:
http://code.google.com/p/rxwen-blog-stuff/source/browse/trunk/android/looper_and_handler/

Thursday, July 29, 2010

implement drag and drop on android

Nowadays, drag and drop is a frequently seen feature on touch screen devices. Tthis post introduces the basic idea of how to implement drag and drop on android.

On android, touch event is composed of a series events.
First, user puts his finger on an element, and the element receives a ACTION_DOWN event.
Then, while holding finger on screen, user moves his finger to a new location. The element receives a series of ACTION_MOVE events.
Finally, user raises his finger. At this point, the element receives ACTION_UP event.
Consider the figure below, the parent element has a child element inside. User can drag the child element anywhere in parent.

There are two important traits of touch event on android.
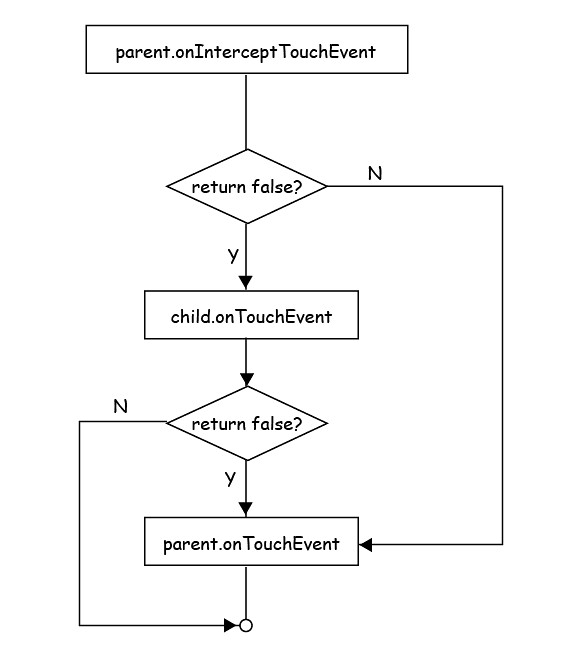
First, touch event will be propagated. That is, if a child chooses to ignore the first event (ACTION_DOWN) by returning false in its onTouchEvent handler, the parent's onTouchEvent handler will receive the event. Unless one of the ancestors agrees to handle the event or the root is reached, the event will continually be propagated.
Second, parent can intercept the touch event before its child's onTouchEvent handler is fired. This is achieved by overriding the onInterceptTouchEvent method on parent, and returning true from it. As a consequence, the child's onTouchEvent handler will be bypassed, and the parent's onTouchEvent handler will fire.
The work flow is shown in below diagram:


We need to setup the onTouchEvent handler for both child and parent. In child's handler, we save the child element as the item to be dragged, and return false so that subsequent event will be delivered to parent's handler. In parent's handler, we change the child's margin to match the position of the finger, so the child will follow our finger.

Sample code:
http://code.google.com/p/rxwen-blog-stuff/source/browse/#svn/trunk/android/drag

Reference:
http://developer.android.com/guide/topics/ui/ui-events.html

Wednesday, July 28, 2010

nook's battery sucks

nook's battery is advertised to be able to run for around 10 days if users trun off the wifi. But my nook can only run for 4 days at maximum, even if I always turn air mode on. On average, I used it for two or three hours per day. That's to say, its battery can only support 12 hours normal usage! It seems the culprit is even in sleep mode, the nook still consumes a lot of battery. In this review for nook, it's said nook consumes battery while turned off !! Ridiculous!

Sunday, July 18, 2010

why offsetof can use null pointer

offsetof is a widely used means in c and c++ to find out the offset of a member variable in its struct or class. The most normal way to implement it is via following macro:
#define offsetof(st, m) ((size_t) ( (char *)&((st *)(0))->m - (char *)0 ))
The idea is very simple. We declare a target type pointer pointing at address 0, then we retrieve the address of its member variable. Because the start address is 0, the value of the pointer to member is the offset.
Everything is clear and simple. But wait, look at how we retrieve the address of the member, it's deferencing a pointer to 0. Why id doesn't give us a segmentation fault?
To understand this, let's check the c code below which retrieve the offset of member c in struct foo.
 1 #include    "stdio.h"
 2
 3 struct foo
 4 {
 5     int a;
 6     char b;
 7     int c;
 8 };
 9
10 int main ( int argc, char *argv[] )
11 {
12     struct foo* fp = (struct foo*)0;
13     unsigned int offset = (unsigned int)&fp->c;
14     printf("offset of c is %u\n", offset);
15     return 0;
16 }               // ----------  end of function main  ----------
Then compile it with miscrosoft's c++ compiler, and dump the revelant assembly code generated by the compiler. We got this:

 1 _main:
 2   00401010: 55                 push        ebp
 3   00401011: 8B EC              mov         ebp,esp
 4   00401013: 83 EC 08           sub         esp,8
 5   00401016: C7 45 FC 00 00 00  mov         dword ptr [ebp-4],0
 6             00
 7   0040101D: 8B 45 FC           mov         eax,dword ptr [ebp-4]
 8   00401020: 83 C0 08           add         eax,8
 9   00401023: 89 45 F8           mov         dword ptr [ebp-8],eax
10   00401026: 8B 4D F8           mov         ecx,dword ptr [ebp-8]
11   00401029: 51                 push        ecx
12   0040102A: 68 5C DC 41 00     push        41DC5Ch
13   0040102F: E8 14 00 00 00     call        _printf
14   00401034: 83 C4 08           add         esp,8
15   00401037: 33 C0              xor         eax,eax
16   00401039: 8B E5              mov         esp,ebp
17   0040103B: 5D                 pop         ebp
18   0040103C: C3                 ret         

It's clear that the compiler doesn't blindly follow the null pointer to get its member variable's address. Instead, because the compiler knows the structure and layout of struct foo, it adds the offset (which is already known to the compiler) of member c to the starting address of struct foo to find out the address of c.
offset doesn't access memory pointed to by the null pointer. That's why we didn't get invalid memory access error while using a null pointer.

Saturday, July 17, 2010

got nook

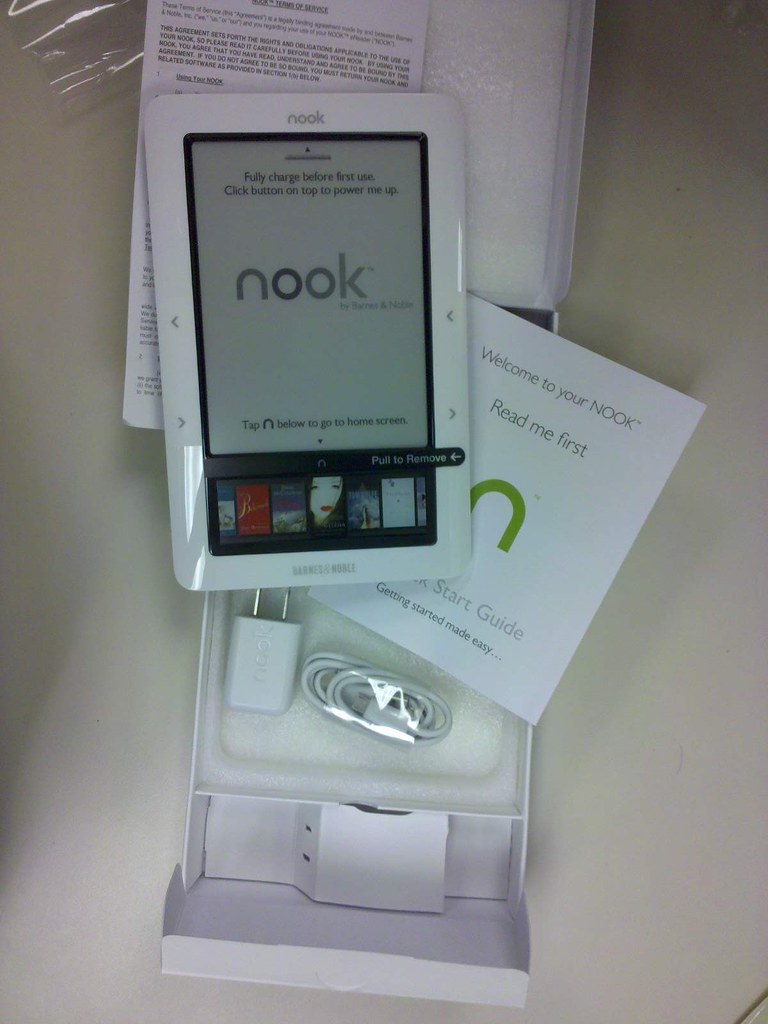
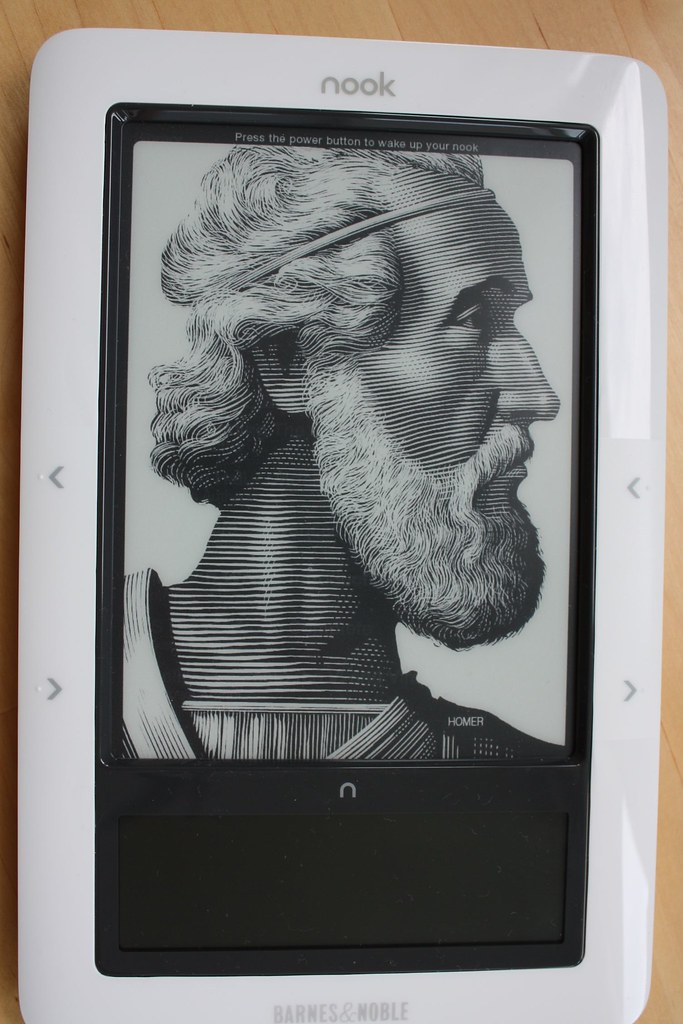
Finally, after more than two weeks' waiting, my nook was delivered to me.

nook and accessories:
screensaver:
main menu:
viewing pdf:
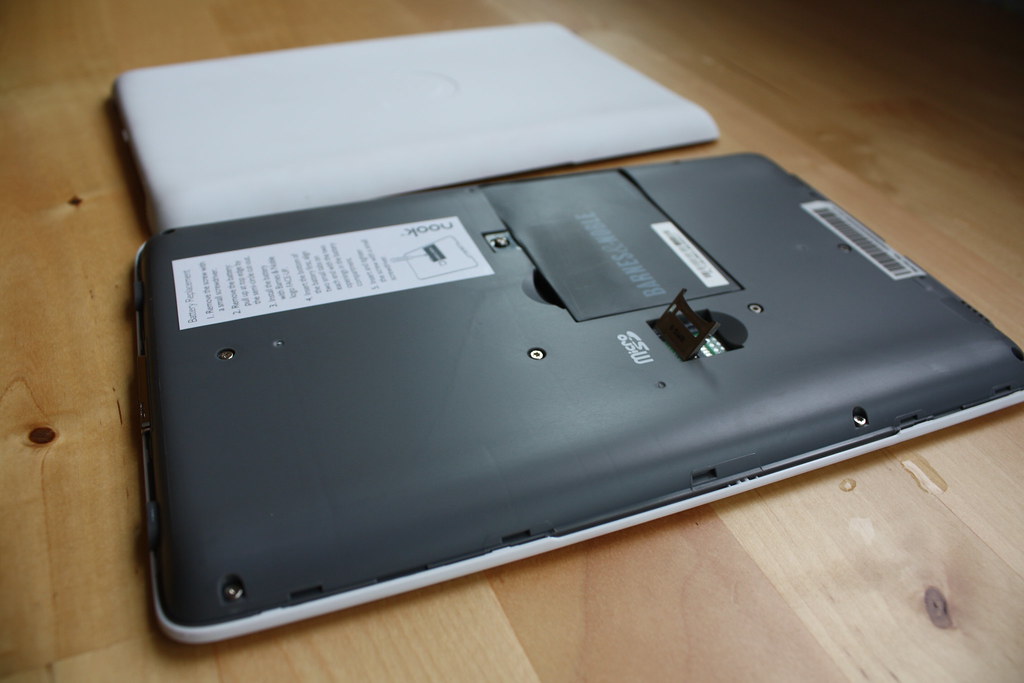
micro-sd card socket:


There are two set of go to previous/next buttons on both left and right side of nook for user's convenience. But they are rather hard to press, and make tick noise upon pressing. A bit annoying if use it in a quiet environment. Then I found in nook's manual that the touch screen in the bottom can also be used for navigation. After the touch screen goes dark, I can swipe my finger on it to navigate. A quick (must be quick enough) swipe from right to left turns to next page, and the oppisite direction turns to previous page. No noise at all.
A flaw with this clever design is the direction of swiping on touch screen is different from the hard button's arrow direction. The hard previous button has a left arrow on it. But the direction for turnning to previous page is from left to right. So wierd.

Wednesday, July 7, 2010

performance impact of printf

Logging is a widely used debugging means. As a way of implementing logging, I saw printf used in a lot of places. It's so quick and easy to use printf to examine the behavior of an application. But it also has heavy impact of the performance of the application, meanwhile, it makes our logging a mess and difficult to read without careful forethought.
The code snippet below calculates the fibonacci number. On line eight, I used printf to print some values. Very simple code. I compiled the code with different printf statement on line eight and run the application to see the performance.

 1 int fib(int a)
 2 {
 3     int rc = 0;
 4     if(a < 2)
 5         rc = a;
 6     else
 7         rc = fib(a-1) + fib(a-2);
 8     printf("rc = %d, a = %d\n", rc, a);
 9     return rc;
10 }
11
12 int main(int argc, char* argv[])
13 {
14     int t1 = GetTickCount();
15     printf("before fib: %d\n", t1);
16     int result = fib(16);
17    
18     int t2 = GetTickCount();
19     printf("after fib: %d   %d  %d  \n", t2, t2 - t1, result);
20     return 0;
21 }
22


The list below shows the time ticks spent with different printf statements, in decreasing order.
4188  (printf("rc = %d, a = %d\n", rc, a) )
3617  (printf("helloworld"))
844    (printf("a"))
858    (printf("%d\n", rc))
302    (printf("%d", rc))
2        (no printf)

It's very clear that the performance drops dramatically if the printf statement is there, and the more complex the format string is, the poorer the performance is. The performance is even 2000 times poorer if we compare the worst case and best case.
The reason is printf needs to invoke system call to output data, which incur a lot of transitions between user mode and kernel mode. And a complex format string also consumes a lot of processing time.

In order to get rid of the performance penalty, yet keep the capability of saving log. We must use a mature logging system, instead of printf directly. An ideal logging system should support switch, logging level and many output mechanisms.
While writing code, we're always enticed to use printf simply because it's easy to write. In contrast, a logging system should require us spending 10 minutes to understand and use. But, the time spent really deserves, considering the time we must spend later on organizing and cleaning printf statement and the possible performance impact of printf.

Monday, July 5, 2010

paste in vim command line

To be able to paste something to vim's command line is a feature makes our life a lot easier. For instance, say we want to change a frequently used variable name in c source file from a_super_long_inproper_variable_for_caching_bank_account_balance to balance. To replace all of the variable's occurrence, we plan to use following replace command:
:%s/a_super_long_inproper_variable_for_caching_bank_account_balance/balance/g
Without paste capability, we have to type the variable name ourself, maybe several times because we doom to type the name wrong.
Luckily, vim has at least two ways to rescue us from having to type the name.
1. command-line window
command-line window is a separate window that enables us editing command just like working in a normal window. Plus, it lists command history. So, we can easily copy the variable name via yank command and paste it to command-line window. To open the command-line window, we can type q: while in normal mode. For more information about command-line window, see help q: in vim.
2. paste with Ctrl+R shortcut key combination
Instead of opening a separate command-line window, we can also paste directly in vim command line. While editing within command line, we can use Ctrl+R, Ctrl+W key combination to paste the word currently under cursor in last window to command line. Beside the forgoing shortcut key, vim features a lot of key combination that let us paste from different sources, like registers, file name, etc. Run :help c_CTRL-R to find more out its real power.

Reference:
Vim documentation: cmdline