Saturday, May 22, 2010

use ffmpeg to setup streaming server on android

ffmpeg is a powerful media library. It provides ffserver tool that can be used to setup a streaming server.
Here is how to compile ffmpeg for android, using CodeSourcery's cross compiler.

1. Download and extract ffmpeg source code.
2. Use below commands to compile ffmpeg
./configure --arch=arm --cross-prefix=arm-none-linux-gnueabi- --extra-ldflags=-static --target-os=linux
make
3. Run file ffserver && readelf ffserver -d  or  arm-none-linux-gnueabi-objdump ffserver -x | grep NEEDED commands  to make sure ffserver is statically linked
4. Transfer ffserver tool, ffserver.conf file (defines what media files will be served by ffserver) and media files to android with adb push command
5. Start streaming server with ./ffserver -f ffserver.conf on andoird shell

Below is a sample ffserver.conf file, which tells the ffserver to listen on rtsp port 7654. It defines two media files for streaming, /data/1.mp3 and /data/1.mp4, respectively. So make sure these files exist.


# Port on which the server is listening. You must select a different
# port from your standard HTTP web server if it is running on the same
# computer.
Port 8090

# Address on which the server is bound. Only useful if you have
# several network interfaces.
BindAddress 0.0.0.0

# Port on which the server is listening. You must select a different

# port from your standard HTTP web server if it is running on the same

# computer.

RTSPPort 7654


# Address on which the server is bound. Only useful if you have

# several network interfaces.

RTSPBindAddress 0.0.0.0


# Number of simultaneous requests that can be handled. Since FFServer

# is very fast, it is more likely that you will want to leave this high

# and use MaxBandwidth, below.

MaxClients 1000


# This the maximum amount of kbit/sec that you are prepared to

# consume when streaming to clients.

MaxBandwidth 1000


# Access log file (uses standard Apache log file format)
# '-' is the standard output.
CustomLog -

# Suppress that if you want to launch ffserver as a daemon.
NoDaemon

<Stream 1.mp4>
Format rtp
File "/data/1.mp4"
</Stream>

<Stream 1.mp3>
Format rtp
File "/data/1.mp3"
</Stream>

To test ffserver, we can start a media player that supports media streaming, and open the url: rtsp://{ip address of the android device}:7654/1.mp3.

Friday, May 21, 2010

invisible directshow render window

A common task we may want to achieve while creating a media application is to start media playback on a new thread, as the sample below shows:
http://code.google.com/p/rxwen-blog-stuff/source/browse/trunk/multimedia/directshow/dbg_directshow_thread_issue/dbg_directshow_thread_issue.cpp
In the menu of the sample, there are two items. "Render File" will start playback on main thread of the application. "Render New Thread" will create a new thread to playback. Everything work fine in the first case, but in the second case, the directshow rendering window isn't visible, I can only hear sound.
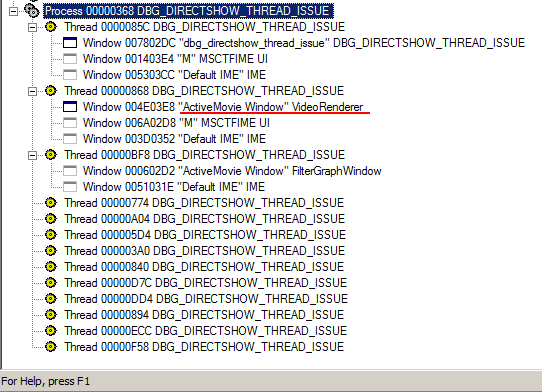
Then I debugged the application with spy++. The image below shows all windows when the media is rendered on main thread. There is a VideoRenderer window exists on main thread.


In contrast, the image below shows all windows when the media is rendered on a new thread. The VideoRenderer window doesn't exist.


I added two lines of code at the end of Render method to block the new thread so it didn't exit after the media playback started. This time, the render window can be seen. All windows are shown below, in which the VideoRenderer window is there.


Actually, the issue has to do with windows working mechanism. A window's window procedure executes on the thread that creates the window. If the corresponding thread ends, the window will also end. That's why we have to keep the new thread from exiting to keep the VideoRenderer window alive.

[quotation from programming windows by Charles Petzold]
Although Windows programs can have multiple threads of execution, each thread's message queue handles messages for only the windows whose window procedures are executed in that thread. In other words, the message loop and the window procedure do not run concurrently. When a message loop retrieves a message from its message queue and calls DispatchMessage to send the message off to the window procedure, DispatchMessage does not return until the window procedure has returned control back to Windows.
However, the window procedure could call a function that sends the window procedure another message, in which case the window procedure must finish processing the second message before the function call returns, at which time the window procedure proceeds with the original message. For example, when a window procedure calls UpdateWindow, Windows calls the window procedure with a WM_PAINT message. When the window procedure finishes processing the WM_PAINT message, the UpdateWindow call will return controls back to the window procedure.
This means that window procedures must be reentrant. In most cases, this doesn't cause problems, but you should be aware of it. For example, suppose you set a static variable in the window procedure while processing a message and then you call a Windows function. Upon return from that function, can you be assured that the variable is still the same? Not necessarily—not if the particular Windows function you call generated another message and the window procedure changes the variable while processing that second message. This is one of the reasons why certain forms of compiler optimization must be turned off when compiling Windows programs.
In many cases, the window procedure must retain information it obtains in one message and use it while processing another message. This information must be saved in variables defined as static in the window procedure, or saved in global variables.
[/quotation]

When working with directshow, it's not necessary to create a new thread explicitly. It's fine to start playback on main thread because the main thread won't be blocked.

Thursday, May 20, 2010

logging with osip

As I posted before, logging is an important debugging means. In order to be truly useful and convenient, the logging module should at lease have two traits:
  1. can be turned on and off globally
  2. supports the concept of logging level
osip also comes with a mature logging system. Besides the traits I just mentioned, it also enables we  to configure log output destination, which can be a plain file, syslog, or a function pointer to a custom logging function. The function pointer enables us to save the log to any possible storage we prefer, e.g., across network.
There is a tiny bug which prevents us using the function pointer mechanism on windows platform if we compile the osip as dynamic library. The author forgot export osip_trace_initialize_func in osipparser2.def file. So our application will end in unresolved external symbol error if we use this function. To get around this, I added the line at the very end of osipparser2.def:
  osip_trace_initialize_func        @416


To use osip logging, we need to:
  1. Compile osip with ENABLE_TRACE macro defined
  2. Define ENABLE_TRACE in our application
  3. Initialize osip logging module
  4. Write log message with:  OSIP_TRACE (osip_trace(__FILE__, __LINE__, OSIP_INFO1, NULL, "log message"));
The wonderful thing is we can easily turn off logging by either undefine ENABLE_TRACE macro, or eliminate the line that initialize osip logging module. We can also trun logging message with specific logging level on and off. Very convenient.

An example is available here:
http://code.google.com/p/rxwen-blog-stuff/source/browse/trunk/protocol/osip_logging/osip_log.cpp

Monday, May 17, 2010

sip elements lifecycle

In sip protocol, the difficult thing is the liecycle of sip elements, including dialog, transaction and message. Though defined as different layers in sip, their lifecycle usually overlaps. Message is the layer at the bottom. Transaction is the layer above message, it's comprised of a sip request message (sent by UAC) and all subsequent response messages (sent by UAS) to the request. A transaction is identified by Branch parameter in Via header. On top of the transaction layer is the dialog layer, which defines a peer-to-peer relationship between participants. Its identifier is the combination of the To tag, From tag and Call-ID.
The lifecycle of elements varies depending on the actual messages exchanged. As an example, Alice called Bob, and Bob accepted the call. During the session initialization process, they exchanged a bunch of sip messages. The lifecycle of transaction and dialog elements are shown below:
(Yellow block and blue block represent the lifecyle of a dialog, indicate Early sate and Confirmed state respectively. Green block represents the lifecycle of a transaction.)
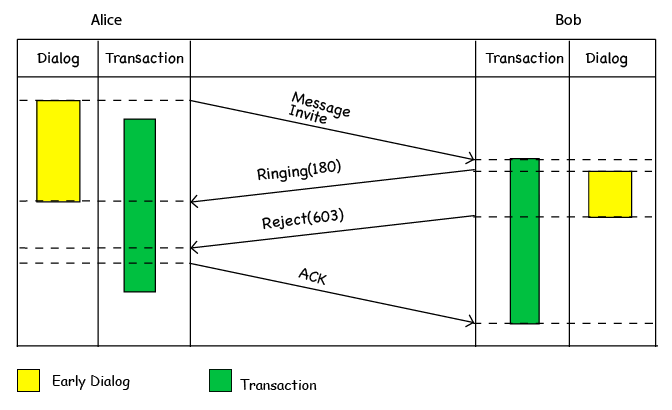
The lifecycle of elements are different if Bob rejected Alice's call. In this case, the ack message belongs to the transaction that created by the invite message, not having its own transaction anymore.


The previous example suffices to show the complexity of sip elements' lifecycle. It's import to understand the lifecycle of elements to implement a mature sip protocol stack.

The essential idea of layered design is to hide lower layer's implementation detail. In sip protocol, though it's designed as layered protocol, the lower layer isn't completely transparent.
Suppose our application runs on top of a sip protocol stack. In an ideal world, our application should only relies on the dialog layer to run. But because dialog's lifecycle doesn't fully cover the lifecycle of transactions in lower layer, our application still has to rely on transaction layer or even message layer. The dependencies on different layers of sip protocol stack make things a lot complicated.
In order to simplify things, many sip protocol stack implementations abstract another higher level layer, "call", which is not defined in sip protocol specification. The existance of this layer successfully decouples our application from those different underlying layers.

Friday, May 14, 2010

capture network traffic on windows ce

When developing network applications, it's always necessary to capture network traffic. Windows ce has built-in sniffer tool, netlog for this purpose. It captures network traffics to a file that can be examined with wireshark or network monitor.
To enable it, we need to select NDIS Packet Capturing DLL and NDIS User-mode I/O Protocol Driver in visual studio, as shown below.


Then, we can capture network traffic with following commands.

1. set capture file lacation:
netlogctl file "\Storage Card\net"
2. start capture
netlogctl start
3. perform network activities
4. stop capture
netlogctl stop
5. copy \Storage Card\net.cap[i].cap to computer and open with wireshark


NetLogctl usage:
netlogctl start - start the loggging.
netlogctl load - start the loggging.
netlogctl stop - stops the loggging.
netlogctl unload - causes networking to unload the netlog component. (may destabilize system)
netlogctl pkt_size  XX - sets maximum packet size captured.
netlogctl cap_size  XX - sets maximum  size of half capture file.
netlogctl file  XXX - sets the name of the file to log.
netlogctl usb  XXX - 1 => log usb , 0 => stop logging usb.
netlogctl state  - print state.
netlogctl trace  - print trace message state for all modules.
netlogctl trace <module> - print trace message state for specified module.
netlogctl trace <module> <filter> - set trace message state for specified module.

Monday, May 10, 2010

use googletest on windows ce

I've been trying to use googletest on windows ce platform to do unit testing. But gtest doesn't provide a windows ce project file, so I had to modify the project myself. Here is how to do so:

1. Add a new platform
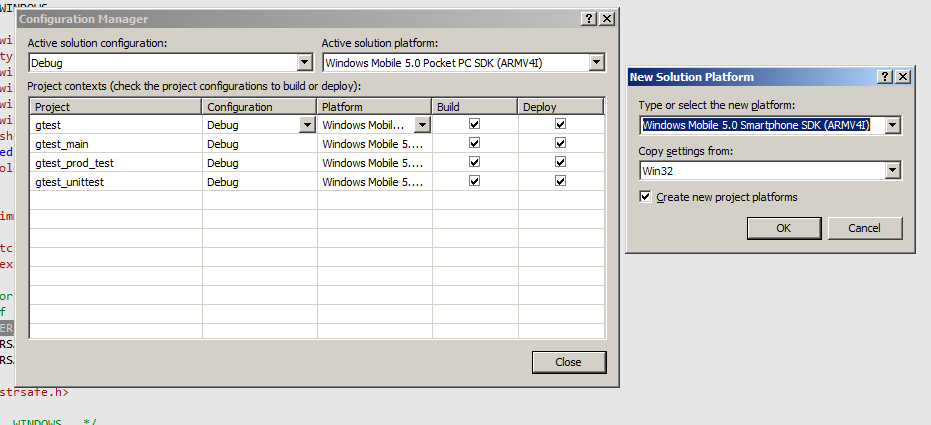
I added a new windows ce based platform (Windows Mobile 5.0 Pocket PC SDK (ARMV4I), for example) in the configuration manager of the gtest project.


2. Add below preprocessor definitions
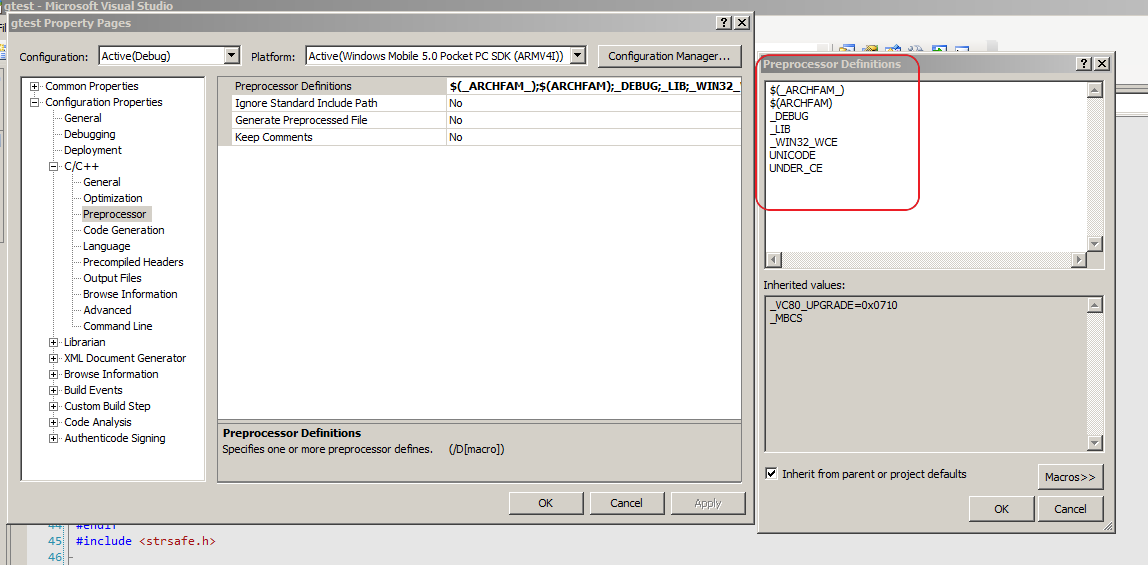
 In order to compile gtest library for windows ce, I used below preprocessor definitions:
 "NDEBUG;_WIN32_WCE=$(CEVER);UNDER_CE;$(PLATFORMDEFINES);WINCE;_CONSOLE;$(ARCHFAM);$(_ARCHFAM_);_UNICODE;UNICODE"

Not all of them are mandatory, but missing the bold ones may cause gtest fail to compile.


3. Create a windows ce console project
The sample project is available at:
http://code.google.com/p/rxwen-blog-stuff/source/browse/#svn/trunk/wince/ce_gtest_proj
This project expects to find gtest header file (gtest\gtest.h) and static library (gtestd.lib) in googletest folder in parent directory.

4. Run the application on emulator/device and verify output
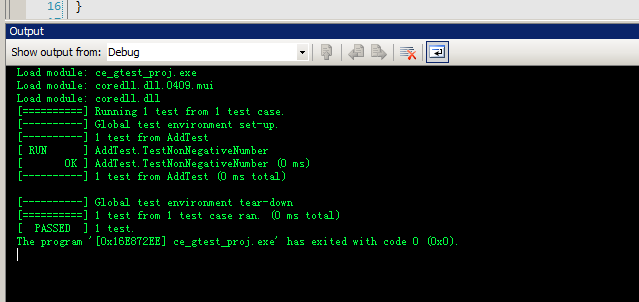
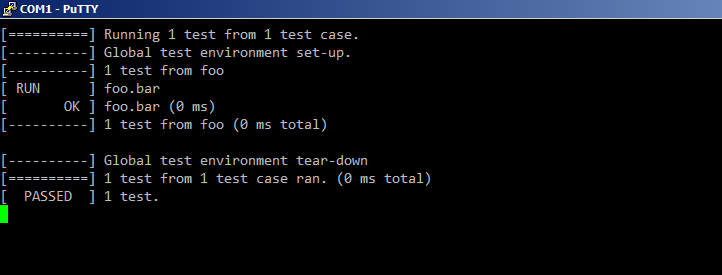
Finally, I run the unit testing application on a windows ce device, and get below outputs in visual studio and serial port output respectively. The output shows that the test case passed successfully.
visual studio output window

device serial port output


It's not always necessary to run unit testing application on windows ce device. If we write our application with care, it's possible that the application can compile and run on both win32 and windows ce platform. Then we can do unit testing on a normal pc, which will be easier and faster.
But I still would like to run the unit testing on windows ce if our product is supposed to run on it. Any subtle differences between win32 and win ce may cause the unit testing succeed on one platform but fail on the other. It's wise to do unit testing on the platform that the application will actually run.