Tuesday, December 25, 2012

examine macro definition in gdb

When debugging a c++ application, I used to refer to source code to find out the actual definition of a macro. If the macro is not a simple one, I had to perform the expansion on a paper or use the 'gcc -E' command to find out what's the actual result. This is a tedious task. The gdb macro command helps examine the macro value, as long as the application under debugging contains information about preprocessor macros. This can be satisfied by passing -g3 option to the gcc compiler. As an example, we need to debug the application below
 1 #define FOO foo_value
 2 #define STR(val) "STR of "#val
 3 #define VAL STR(FOO)
 4 
 5 int main(int argc, const char *argv[])
 6 {
 7     const char* t = VAL;
 8 #undef VAL
 9 #define VAL "test" // define VAL to a different value 
10     const char* t2 = VAL;
11 
12     return 0;
13 }
We compile the code with gcc -g3 command, and debug it in gdb. Then we can examine the actual value of VAL macro with macro exp command.
(gdb) macro exp VAL  // run when break on line 7
expands to: "STR of ""FOO"
....
(gdb) macro exp VAL  // run when break on line 10
expands to: "test"
It's worthy of note that the macro expansion is context awareness in gdb, so we can get different value when the application breaks on line 7 and 10.

Sunday, November 25, 2012

user event in libevent

libevent is usually used as substitution for select system call to write efficient and portable code. A benefit of libevent is, besides normal fd, it enables monitoring signal, timeout and user supplied event in a consistent manner. 
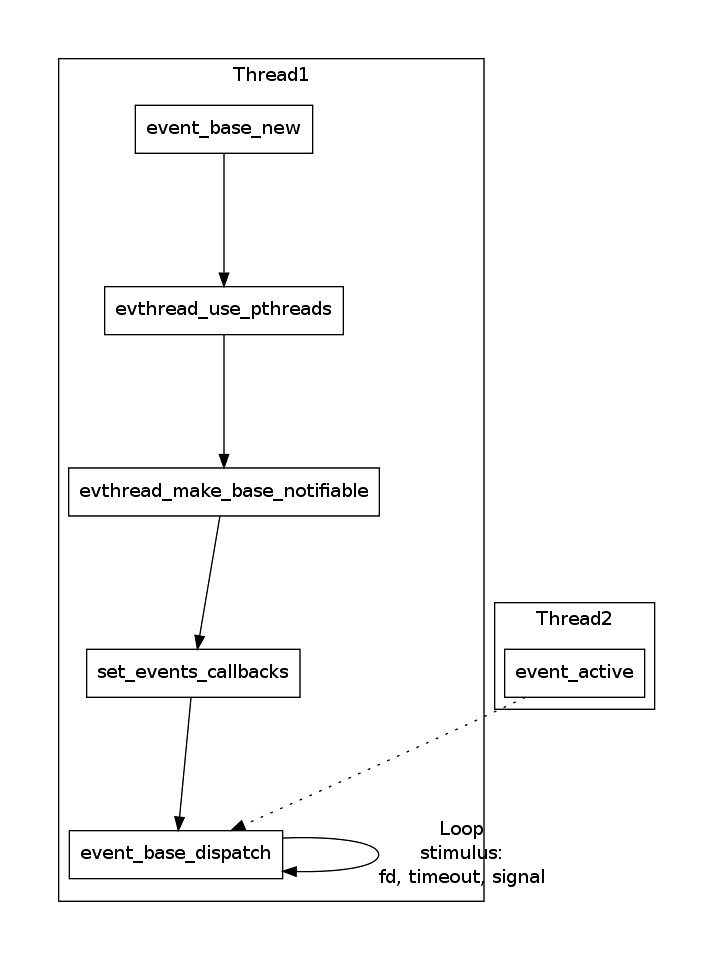
Typically, the code makes use of libevent has the below structure:
libevent_code_structure
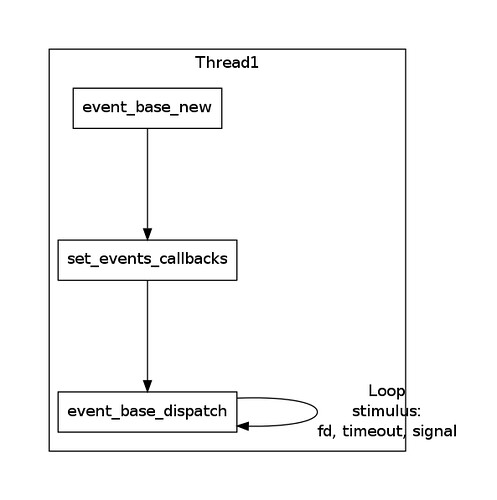
In the final step, we call event_base_dispatch function which will run a loop on current thread until there is no more events to handle. Since the thread is busy running the loop, if we want to active an user event, we must do it in a new thread. We should notice that in libevent, we must explicitly set threading support via the evthread_use_pthreads or evthread_use_windows_threads, and we should call evthread_make_base_notifiable function so that event_base can be notified by events on another thread. So, in order to use user event, we need to following things:
  1. Create an event struct for user event, and add it to the event_base
  2. Prepare threading for event_base by calling evthread_use_pthreads/evthread_use_windows_threads and evthread_make_base_notifiable
  3. Start a new thread, and monitor if the user event should be fired
  4. Call event_active on the user event if the firing condition has been satisfied The structure is shown below:
libevent_user_event_code_structure
And here is sample code.
  1 /*
  2   This exmple program provides a trivial server program that listens for TCP
  3   connections on port 9995.  When they arrive, it writes a short message to
  4   each client connection, and closes each connection once it is flushed.
  5 
  6   Where possible, it exits cleanly in response to a SIGINT (ctrl-c).
  7 */
  8 
  9 
 10 #include <string.h>
 11 #include <errno.h>
 12 #include <stdio.h>
 13 #include <signal.h>
 14 #ifndef _WIN32
 15 #include <netinet/in.h>
 16 # ifdef _XOPEN_SOURCE_EXTENDED
 17 #  include <arpa/inet.h>
 18 # endif
 19 #include <sys/socket.h>
 20 #endif
 21 #include <pthread.h>
 22 
 23 #include <event2/bufferevent.h>
 24 #include <event2/buffer.h>
 25 #include <event2/listener.h>
 26 #include <event2/util.h>
 27 #include <event2/event.h>
 28 #include <event2/thread.h>
 29 
 30 static const char MESSAGE[] = "Hello, World!\n";
 31 
 32 static const int PORT = 9995;
 33 
 34 static void listener_cb(struct evconnlistener *, evutil_socket_t,
 35     struct sockaddr *, int socklen, void *);
 36 static void conn_readcb(struct bufferevent *, void *);
 37 static void conn_writecb(struct bufferevent *, void *);
 38 static void conn_eventcb(struct bufferevent *, shortvoid *);
 39 static void signal_cb(evutil_socket_t, shortvoid *);
 40 
 41 static struct event* init_user_event(struct event_base*);
 42 static void* user_event_proc(void*);
 43 
 44 int main(int argc, char **argv) {
 45     struct event_base *base;
 46     struct evconnlistener *listener;
 47     struct event *signal_event, *user_event;
 48     pthread_t th;
 49 
 50     struct sockaddr_in sin;
 51     int rc = 0;
 52 #ifdef _WIN32
 53     WSADATA wsa_data;
 54     WSAStartup(0x0201, &wsa_data);
 55 #endif
 56 
 57     base = event_base_new();
 58     if (!base) {
 59         fprintf(stderr"Could not initialize libevent!\n");
 60         return 1;
 61     }
 62 
 63     evthread_use_pthreads();
 64     if (evthread_make_base_notifiable(base)<0) {
 65         printf("Couldn't make base notifiable!");
 66         return 1;
 67     }
 68     memset(&sin, 0sizeof(sin));
 69     sin.sin_family = AF_INET;
 70     sin.sin_port = htons(PORT);
 71 
 72     listener = evconnlistener_new_bind(base, listener_cb, (void *)base,
 73         LEV_OPT_REUSEABLE|LEV_OPT_CLOSE_ON_FREE, -1,
 74         (struct sockaddr*)&sin,
 75         sizeof(sin));
 76 
 77     if (!listener) {
 78         fprintf(stderr"Could not create a listener!\n");
 79         return 1;
 80     }
 81 
 82     signal_event = evsignal_new(base, SIGINT, signal_cb, (void *)base);
 83 
 84     if (!signal_event || event_add(signal_event, NULL)<0) {
 85         fprintf(stderr"Could not create/add a signal event!\n");
 86         return 1;
 87     }
 88     user_event = init_user_event(base);
 89     pthread_create(&th, NULL, user_event_proc, user_event);
 90 
 91     /*rc = event_base_loop(base, EVLOOP_NO_EXIT_ON_EMPTY);*/
 92     event_base_dispatch(base);
 93 
 94     evconnlistener_free(listener);
 95     event_free(signal_event);
 96     event_free(user_event);
 97     event_base_free(base);
 98 
 99     printf("done\n");
100     return 0;
101 }
102 
103 static void listener_cb(struct evconnlistener *listener, evutil_socket_t fd,
104     struct sockaddr *sa, int socklen, void *user_data) {
105     struct event_base *base = (struct event_base*)user_data;
106     struct bufferevent *bev;
107 
108     bev = bufferevent_socket_new(base, fd, BEV_OPT_CLOSE_ON_FREE);
109     if (!bev) {
110         fprintf(stderr"Error constructing bufferevent!");
111         event_base_loopbreak(base);
112         return;
113     }
114     bufferevent_setcb(bev, conn_readcb, conn_writecb, conn_eventcb, NULL);
115     bufferevent_enable(bev, EV_WRITE);
116     bufferevent_enable(bev, EV_READ);
117 
118     /*bufferevent_write(bev, MESSAGE, strlen(MESSAGE));*/
119 }
120 
121 static void conn_readcb(struct bufferevent *bev, void *) {
122     struct evbuffer *input = bufferevent_get_input(bev);
123     printf("readcb\n");
124     int len = evbuffer_get_length(input);
125     if (len != 0) {
126         printf("readcb parse_message\n");
127         char* buf = new char[len]();
128         evbuffer_copyout(input, buf, len);
129         delete[] buf;
130     }
131     bufferevent_write(bev, MESSAGE, strlen(MESSAGE));
132 }
133 
134 static void conn_writecb(struct bufferevent *bev, void *user_data) {
135     struct evbuffer *output = bufferevent_get_output(bev);
136     if (evbuffer_get_length(output) == 0) {
137         printf("flushed answer\n");
138         /*bufferevent_free(bev);*/
139     }
140 }
141 
142 static void conn_eventcb(struct bufferevent *bev, short events, void *user_data) {
143     if (events & BEV_EVENT_EOF) {
144         printf("Connection closed.\n");
145     } else if (events & BEV_EVENT_ERROR) {
146         printf("Got an error on the connection: %s\n",
147             strerror(errno));/*XXX win32*/
148     }
149     /* None of the other events can happen here, since we haven't enabled
150      * timeouts */
151     bufferevent_free(bev);
152 }
153 
154 static void signal_cb(evutil_socket_t sig, short events, void *user_data) {
155     struct event_base *base = (struct event_base*)user_data;
156     struct timeval delay = { 10 };
157 
158     printf("Caught an interrupt signal; exiting cleanly in one second.\n");
159 
160     event_base_loopexit(base, &delay);
161 }
162 
163 static void user_event_cb(evutil_socket_t, short events, void *user_data) {
164     printf("user event %04x fired!!!!!\n", events);
165     struct event_base *base = (struct event_base*)user_data;
166     /*event_base_dump_events(base, stdout);*/
167 }
168 
169 static struct event* init_user_event(struct event_base* base) {
170     struct event *ev_user = NULL;
171     struct timeval timeout = { 20 };
172     ev_user = event_new(base, -1, EV_TIMEOUT|EV_READ, user_event_cb, base);
173     /*event_add(ev_user, &timeout);*/
174     return ev_user;
175 }
176 
177 static void* user_event_proc(void* data) {
178     printf("start user event thread\n");
179     struct event *ev_user = (struct event*)data;
180     char buf[512] = {0};
181 
182     while(1) {
183         fgets(buf, sizeof(buf), stdin);
184         printf("read %d bytes from stdio, now fire user event\n"0);
185         event_active(ev_user, EV_READ|EV_WRITE, 1);
186     }
187     return NULL;
188 }

Sunday, October 21, 2012

communication between android widget and application

Widget is a convienent feature in android that gives users quick access to frequently used application functions. A example is the power control widget. It helps us quickly toggling accessories such as WIFI, GPS power to conserve battery, without tedious operations.
android power control widget
When we plan to provide widget in our own application, an important thing to think about is the communication model between the widget and application. In a simiplified manner, the commucation model is shown below.
communication model diagram
The widget is shown on home screen(which is a AppWidgetHost), and user can interact(e.g., touch) with the widget. The result of the interaction is either showing an activity to the user to display more information, or controlling the state of a background service. Meanwhile, the background service may proactively update the widget to inform user current state. The communication model is bidirectional.

Launch activity from widget

To launch an activity from widget, we can use RemoteViews's setOnClickPendingIntent method to set a intent for the target button. Once the button is clicked, the intent will be sent to start desired activity. The snippet below shows how to do this in AppWidgetProvider.
 1 import android.app.PendingIntent;
 2 
 3 import android.appwidget.AppWidgetManager;
 4 import android.appwidget.AppWidgetProvider;
 5 
 6 import android.content.Context;
 7 import android.content.Intent;
 8 
 9 import android.widget.RemoteViews;
10 
11 public class GestureAppWidgetProvider extends AppWidgetProvider {
12 
13         public void onUpdate(Context context, AppWidgetManager appWidgetManager, int[] appWidgetIds) {
14             final int N = appWidgetIds.length;
15 
16             // Perform this loop procedure for each App Widget that belongs to this provider
17             for (int i=0; i<N; i++) {
18                 int appWidgetId = appWidgetIds[i];
19 
20                 // Create an Intent to launch Activity
21                 Intent intent = new Intent(context, MainActivity.class);
22                 PendingIntent pendingIntent = PendingIntent.getActivity(context, 0, intent, 0);
23 
24                 // Get the layout for the App Widget and attach an on-click listener
25                 // to the button
26                 RemoteViews views = new RemoteViews(context.getPackageName(), R.layout.appwidget);
27                 views.setTextColor(R.id.startRecord, Color.GREEN);
28                 views.setOnClickPendingIntent(R.id.startRecord, pendingIntent);
29 
30                 // Tell the AppWidgetManager to perform an update on the current app widget
31                 appWidgetManager.updateAppWidget(appWidgetId, views);
32             }
33         }
34 }

Send message to service from widget

The skeleton of code to send message to a service is pretty much the same as the snippet above. The change we need to make is substitute PendingIntent.getActivity with PendingIntent.getBroadCast. The result is once we clicked the button, a broadcast Intent will be sent, and our AppWidgetProvider(which is a subclass of BroadcastReceiver) will get this intent. Thie AppWidgetProvider runs in our application's process, so it can send the message to our service with StartService.
 1 public class WeatherWidgetProvider extends AppWidgetProvider {
 2     public static String REFRESH_ACTION = "com.example.android.weatherlistwidget.REFRESH";
 3 
 4     @Override
 5     public void onReceive(Context ctx, Intent intent) {
 6         final String action = intent.getAction();
 7         if (action.equals(REFRESH_ACTION)) {
 8             // send message to background service via startService here
 9             // ..............
10         }
11         super.onReceive(ctx, intent);
12     }
13 
14     @Override
15     public void onUpdate(Context context, AppWidgetManager appWidgetManager, int[] appWidgetIds) {
16         for (int i = 0; i < appWidgetIds.length; ++i) {
17             final RemoteViews rv = new RemoteViews(context.getPackageName(), R.layout.widget_layout);
18             rv.setRemoteAdapter(appWidgetIds[i], R.id.weather_list, intent);
19 
20             // Set the empty view to be displayed if the collection is empty.  It must be a sibling
21             // view of the collection view.
22             rv.setEmptyView(R.id.weather_list, R.id.empty_view);
23 
24             // Bind the click intent for the refresh button on the widget
25             final Intent refreshIntent = new Intent(context, WeatherWidgetProvider.class);
26             refreshIntent.setAction(WeatherWidgetProvider.REFRESH_ACTION);
27             final PendingIntent refreshPendingIntent = PendingIntent.getBroadcast(context, 0,
28                     refreshIntent, PendingIntent.FLAG_UPDATE_CURRENT);
29             rv.setOnClickPendingIntent(R.id.refresh, refreshPendingIntent);
30 
31             appWidgetManager.updateAppWidget(appWidgetIds[i], rv);
32         }
33         super.onUpdate(context, appWidgetManager, appWidgetIds);
34     }
35 }

Update widget from service

To update a widget from service, we can send a broadcast message from the background service to AppWidgetProvider. Once the AppWidgetProvider receives the message, it tries to fetch current state and calls notifyAppWidgetViewDataChanged function to refresh the widget.
public void onReceive(Context ctx, Intent intent) {
    final String action = intent.getAction();
    if (action.equals(SHOW_NEW_DATA_ACTION)) {
        final AppWidgetManager mgr = AppWidgetManager.getInstance(context);
        final ComponentName cn = new ComponentName(context, WeatherWidgetProvider.class);
        mgr.notifyAppWidgetViewDataChanged(mgr.getAppWidgetIds(cn), R.id.weather_list);
    }
    super.onReceive(ctx, intent);
}

Reference:

android WeatherListWidget sample
Introducing home screen widgets and the AppWidget framework
android appwidget source code
android appwidget service source code

Friday, August 31, 2012

debug linux kernel with gdb

People often use gdb to debug user mode applications, which is a convenient debugging means. It's also possible to use gdb to debug linux kernel and drivers with the help of kgdb. This page is a good tutorial for how to use kgdb.

Benefits of using gdb to debug kernel

  • It helps us understanding linux internals. In linux, it's very common to see structures with a lot of function pointer members being passed around. And it's not easy to find out where and how these function pointers are actually called by reading code. By setting breakpoint on the function, we can easily find how linux call into it.
  • It saves the debugging time. If we only debug by printk, we usually have to compile and deploy linux kernel multiple times to fix a minor bug. It's more efficient to debug if we can step through the code and see all variables' value in real time.

Preparations

As the precedent document illustrates, to enable kgdb for a kernel, we need to:
  • Enable kernel config options for kgdb
  • Provide a polling tty driver for the kgdboc I/O driver.
  • Set linux boot argument to instruct linux kernel use our kgdb I/O driver

How to complete a kgdb I/O driver

Linux contains a kgdb I/O driver, kgdboc, short for kgdb over console. It's acutally a thin driver that relies on low level hardware driver supporting polling operation. This low level driver must be implemented by us.
To complete the polling driver, we need to implement poll_get_char and poll_put_char callbacks in the UART driver. There is a good example for us to follow in linux source code: 8250.c.

How to debug if there is only one serial port

kgdboc is designed to work when there is only one serial port on our board. The serial port can be used as primary console as well as the communication channel with gdb. In this case, we should first connect our serial port client (e.g., kermit) to the console and input 'echo g > /proc/sysrq-trigger' command to break into linux kernel. Now linux should halt and wait for a gdb client to connect. Then we exit the serial port client process and start a gdb client to connect to the linux on the same serial port. It's time-division multiplexing on the serial port.
The agent-proxy make the process even easier. agent-proxy is a tty to tcp connection mux that allow us connect more than one client application to a tty. By using it, we can run the serial port client and gdb process simultaneously. aa

How to debug linux initialization code

If we specify kgdbwait parameter in kernel boot args, the kernel will halt automatically during the initialization process and wait for a gdb client to connect. There are several things to note:
  • The kgdb core tries to break the execution as soon as a kgdb io driver is registered, which is done while the kgdboc module is initialized. As a result, it's necessary to set kgdboc module as built-in, rather than a module.
  • Our UART driver must be initialized before the kgdboc driver. Or the kgdboc driver will fail to initialize. Becuase there isn't a reliable way to specify loading order for built-in modules at the same level, it's better to specify our UART driver at a precedent level than kgdboc, for instance, fs_initcall.
  • The module initialization is called through this call stack: start_kernel -> rest_init -> kernel_init -> do_basic_setup -> do_initcalls. So, we can't debug code earlier than do_initcalls.

How to debug loadable module

When we need to debug a loadable module, we should add the ko file with symbol information to gdb with add-symbol-file command. We must provide the module's load address explicitly. How can we find out where the module is loaded? After we've insmod the module, we can find out the load address of the module by either read the /proc/modules pseudo file or use info shared command in gdb. But what if we need to debug the module_init function? It will be too late to set breakpoint after we've alreay loaded the module to find out its load address. We can solve this dilemma by setting a breakpoint in sys_init_module after the load_module function returns. And we can find out the module's load address with p mod->module_core command in gdb. We can add symbol file at this point and set a breakpoint in the actual module_init function. Or we can set a breakpoint in do_one_initcall.

Saturday, July 7, 2012

improve c++ autocomplete in vim with clang-complete plugin

clang-complete is a powerful vim autocomplete plugin for c/c++ developers. Unlike the famous OmniCppComplete plugin, which makes use of ctag database to implement completion, the clang-complete plugin take advantage of the clang compiler. With the help of compiler, far more knowledge can be gained than the tag matching method. So the plugin can achieve a very precise completion, just like how visual studio does.

clang-complete mode

1. executable mode

In this mode, each time we trigger a completion (Ctrl_X Ctrl_U) in vim, the plugin will invoke the clang executable on the specified position in source code, then read and parse the executable's output to use as the candidates list.

2. library mode

In this mode, the plugin will run a python script to invoke the libclang library to get the candidates list. As the author indicates, the libclang library employs cache mechanism and runs much faster than the executable mode. I also observed another difference. On windows, the clang.exe may fail to compile our source code and returns a non-0 exit code. In this case, the plugin only returns an empty list, even though it may be able to produce a correct list. But the library mode doesn't have this limitation. So, it's the recommended way to use.

how to use it

Ubuntu

By following instructions in this wiki page, the plugin works very well on ubuntu. The only thing wasn't mentioned in the documenataion is that in order to use library mode, we must install the libclang-dev package.

Windows

The experience of using the plugin of windows is much more difficult.

1. Get a windows version clang

Since new version (v3.1) of clang can be compiled with visual studio, it's not difficult to compile the clang.exe and libclang.dll myself. Just note that though the clang can run on windows and can compile our c++ code, it can't performing linking. That's fair enough to simply use clang for our purpose.
And you can get the binaries I compiled here, for free :).

2. Get right output in executable mode

The clang.exe on windows outputs a lot of message to stderr, which are not interested by the plugin at all. Because the plugin uses system() function to invoke clang.exe, and the function will automatically redirect stderr to stdout by default. The author of the plugin suggests we can use let g:clang_user_options = '2> NUL || exit 0"' to get rid of stderr output. But it doesn't work for me. And I finally come up with this patch to fix the problem.
diff --git a/plugin/clang_complete.vim b/plugin/clang_complete.vim
old mode 100644
new mode 100755
index 7cb0fe0..6db164d
--- a/plugin/clang_complete.vim
+++ b/plugin/clang_complete.vim
@@ -421,6 +421,8 @@ function! s:ClangCompleteBinary(base)
     return {}
   endtry
   let l:escaped_tempfile = shellescape(l:tempfile)
+  let l:shellredir_orig = &shellredir
+  let &shellredir ='>%s 2>NUL'

   let l:command = g:clang_exec . ' -cc1 -fsyntax-only'
         \ . ' -fno-caret-diagnostics -fdiagnostics-print-source-range-info'
@@ -429,6 +431,8 @@ function! s:ClangCompleteBinary(base)
         \ . ' ' . b:clang_parameters . ' ' . b:clang_user_options . ' ' . g:clang_user_options
   let l:clang_output = split(system(l:command), "\n")
   call delete(l:tempfile)
+  " restore original shellredir
+  let &shellredir = l:shellredir_orig

   call s:ClangQuickFix(l:clang_output, l:tempfile)
   if v:shell_error

3. Make python ctypes module to work in library mode

The plugin uses ctypes module to invoke the libclang.dll. Due to a mysterious reason, the ctypes module can't be loaded successfully when run from embedded python in vim. I got the the "ImportError: No module named _ctypes" error and the plugin failed to work. But when I tested from a standalone python instance, the ctypes module worked well. After some debugging, it seems the embedded python doesn't search {python_root}/dlls directory to load _ctypes.pyd file, but the standalone python does. So I take a nasty method to solve the problem by copying the _ctypes.pyd to the clang_complete's plugin directory, right besides libclang.py file.

Saturday, June 30, 2012

got multiple singleton instances

We meet a subtle bug while adopting singleton design pattern in a project. The singleton class creates multiple instances.
The image below depicts the dependency relationship between different modules.


The executable depends on two dynamic libraries, dynamic_lib1 and dynamic_lib2. And both dynamic_lib1 and dynamic_lib2 depends on static_lib. There is a singleton class in static_lib. dynamic_lib1 and dynamic_lib2 use get_instance method to retrieve the instance of the singleton class.
The basic skeleton of the singleton class is shown below:

 1 // singleton.h
 2 #pragma once
 3 
 4 class __declspec(dllexport)  singleton
 5 {
 6 public:
 7     singleton(void);
 8     ~singleton(void);
 9 
10     static singleton* instance;
11     static singleton* get_instance();
12 };
13 
14
15
// singleton.cpp
16 #include "singleton.h"
17 #include <iostream>
18 
19 singleton* singleton::instance;
20 
21 singleton::singleton(void)
22 {
23 }
24 
25 singleton::~singleton(void)
26 {
27 }
28 
29 
30 singleton* singleton::get_instance()
31 {
32     // lock here
33     if(!instance)
34     {
35         instance = new singleton();
36     }
37     // unlock here
38     return instance;
39 }


But when we run the executable, we're surprised to find that the the use of get_instance method in dynamic_lib1 and dynamic_lib2 doesn't share the same instance.

After thinking about it carefully, it's clear that the bug is caused by we use static_lib3 as a static library. When we compile dynamic_lib1 and dynamic_lib2, they both link with static_lib, and each get a separate copy of the singleton::instance in data section.

But be aware that the behavior is compiler specific. The singleton is still singleton when I tested with gcc. And the singleton got created multiple instances when I tested microsoft's C++ compiler and apple's developer tools.

Friday, May 11, 2012

port libcurl to wince

libcurl is a powerful network transfer library. It has support for many popular protocols and can make our application easier to integrate with other network servers.
libcurl requires some posix headers to compile, which isn't available on windows ce platform. In order to port it, we must provide a  posix adapter layer, which can be achieved with wcecompat library.
It's not enough to only have wcecompat library, because the source code of libcurl isn't fully wince compatible. We can apply this patch to libcurl source code to make it compile fine.

Friday, March 9, 2012

build subversion 1.7 for ubuntu 11.04

subversion 1.7 has many new fascinating features, like viewing diff in svn log command, and a cleaner directory layout (only one .svn folder in root directory, just like git does). But this version isn't available in ubuntu's official source. To upgrade to this new version, I choose to build it myself.

  1. Download neon, which adds http and https protocol support to svn
  2. cd to neon source root directory and run: ./configure --enable-shared --with-ssl
  3. Then run: make && sudo make install
  4. Download and extract svn source
  5. Download sqlite-amalgamation , extract it and copy to sqlite-amalgamation
  6. cd to svn source root directory
  7. run svn co http://svn.apache.org/repos/asf/apr/apr-util/branches/1.3.x apr-util
  8. run svn co http://svn.apache.org/repos/asf/apr/apr/branches/1.3.x apr
  9. cd to apr and run: ./buildconf
  10. cd to apr-util and run: ./buildconf
  11. go back to svn source root directory and run: ./configure --with-ssl
  12. edit files below
    apr/build/apr_rules.mk:38  change $(top_builddir) to $(apr_builddir)
    apr-util/build/rules.mk:38  change $(top_builddir) to $(apr_builddir)
  13. make
  14. sudo make install

Wednesday, February 22, 2012

solve "Host 'awk' tool is outdated." problem for ndk

While using ndk-build command in ndk r7 to build a project on 32-bit ubuntu, I got this error:
Android NDK: Host 'awk' tool is outdated. Please define HOST_AWK to point to Gawk or Nawk !

It didn't work even if I add the HOST_AWK environment variable and point it to gawk.
There are two reasons:
  1. The prebuilt awk tool comes with ndk r7 is compiled for 64bit and can't run on 32bit os
  2. The HOST_AWK environment variable is overridden by {ndk_root}/build/core/init.mk to point to the prebuilt awk comes with ndk

To solve this problem, remove {ndk_root}/prebuilt/linux-x86/bin/awk. Now the ndk-build script will use correct awk tool.

Saturday, January 7, 2012

adepends.py, utility for analysing android module dependency

There are thousands of modules within android system. They form a very complicated dependency graph. When we want to learn about a particular module in android system, it's not easy to find out where modules that are dependent on by the module we mainly focus on are located. To make this task easier, I wrote adepends.py, which can be used to analysis dependency relationship between modules. It's capable of:
  1. List modules defined within a directory
  2. Generate a graphviz dot based diagram file to show dependency relationship
To show which modules are defined in a directory, we can use this command: "adepends.py -l DIRECTORY_NAME". For example, if we run "adepends.py -l external/protobuf/" command, we get below output:
libprotobuf-java-2.3.0-micro
libprotobuf-cpp-2.3.0-lite
host-libprotobuf-java-2.3.0-micro
libprotobuf-cpp-2.3.0-full
host-libprotobuf-java-2.3.0-lite
aprotoc
libprotobuf-java-2.3.0-lite

To generate a dependency diagram for a particular module, we can use this command: "adepends.py -o output.dot -m module_name". For example, if we're interested in the dependency diagram for charger module,  we can use this command: "adepends.py -o output.dot -m charger". After the command finished, we have output.dot in current directory. Then we run "dot -Tpng -ooutput.png output.dot" to generate a png file for the diagram. And the diagram is shown below:

Each ellipse represents a module, the top line shows the module name, and the bottom line shows the directory that the module is defined. The arrowed edge represents the dependency relationship between two modules.