Having tried metauml as my primary design utility recently, the experience isn't as good as I expected. At the beginning, I thought I would be more focused on the content/design while using a pure textual editing tool, but the result is very frustrating. Because I have to pay more attention on the organization and layout, rather than the design. metauml doesn't help me organizing elements at all, leave it all to me. I have to think in advance where should an element be placed, and instructed metauml to place the element explicitly, either in absolute coordinate or in relative coordinate. It seems ok for simple diagrams with very few elements. But as the number of elements increases, it's very hard to plan in advance. Once I made a mistake, the cost to change it is huge, I may have to re-organize everything, to keep the diagram clean.
I found an graphical tool, bouml, as an great replacement. It's efficient and powerful. bouml saves everything in text, so it's also possible to do version control. The best feature I noticed so far is its capability of reversing c++ code. By feeding it with source code directories, it will generate a full list of classes, methods exist in the code. It's very helpful for analyzing others' projects.
Friday, December 24, 2010


Tuesday, December 21, 2010
common programming and debugging tools
To help me memorize commonly used programming and debugging tools on windows and linux, I created a wiki page here:
http://code.google.com/p/rxwen-blog-stuff/wiki/CommonProgrammingAndDebuggingToolsOnWinAndLinux
http://code.google.com/p/rxwen-blog-stuff/wiki/CommonProgrammingAndDebuggingToolsOnWinAndLinux
Sunday, December 19, 2010
port exosip to android
Port exosip to android platform isn't a difficult task because exosip doesn't rely on any special system calls that aren't available on android. It only requires osip to compile, which can also be easily ported.
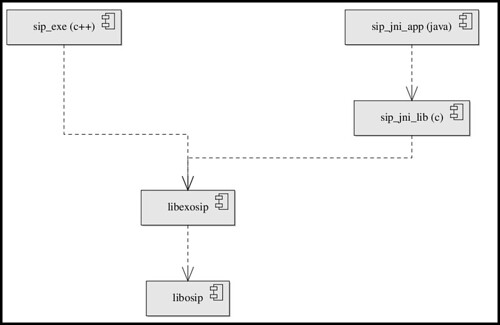
As an example, I created two applications to run against exosip lib. One is a native application that can run in android shell, the other is an java application that interact with exosip through jni. The dependency relationship between modules is:
The diagram below depicts the organization of files. They're organized this way so that they can be compiled through android ndk build system.
Note that we don't create jni directory for libosip and libexosip, their Android.mk is placed directly under libosip and libexosip directories. This is because they are dependent on by application modules. We don't need compile them directly, instead, the build system will build them automatically while building applications. In order to help build system find libosip and libexosip, we must set NDK_MODULE_PATH environment variable to the directory that directly containing libosip and libexosip. The build system will search for them based on directory name, so their names matter.
To port exosip to android, the essential task is to create the Android.mk file, which specifies source files, c flags, ld flags, dependent libraries. We define HAVE_TIME_H and HAVE_SYS_SELECT_H to compile exosip successfully. And we define ENABLE_TRACE and OSIP_MT to enable logging and multi-threading. In the last line, $(call import-module,libosip) tells the build system that exosip depends on osip, and all header files exported by osip (LOCAL_EXPORT_C_INCLUDES:=$(LOCAL_C_INCLUDES)) will be included by exosip automatically.
import-module is a feature that isn't available in the build system in android source tree. It enables us organizing our projects in arbitrary manner. For example, we can place libosip and libexosip directories in another directory. The build system can still find them as long as NDK_MODULE_PATH is set to the directory containing them. It's much more flexible than specifying dependency relationship with relative path.
Sample:
The sample for this post is available at:
http://code.google.com/p/rxwen-blog-stuff/source/browse/trunk/android/exosip_sample/
It shows how to:
ndk document
exosip user manual
As an example, I created two applications to run against exosip lib. One is a native application that can run in android shell, the other is an java application that interact with exosip through jni. The dependency relationship between modules is:
The diagram below depicts the organization of files. They're organized this way so that they can be compiled through android ndk build system.
exosip_root (NDK_MODULE_PATH environment variable points here)
To comply with ndk build system's requirements, we create a directory named jni under sip_jni and sip_exe module, and place actual source file there. The Android.mk and Application.mk (optional) are placed in the jni directory as well. Keeping files this way, we can issue ndk-build command right in sip_jni or sip_exe directories to compile applications.- libosip
- libexosip
- sip_exe
- sip_jni
- jni
- Android.mk
- source files
- Android.mk
- libs
- armeabi
- libosip.so
- libexosip.so
- libosip.so
- armeabi
- src
- java source files
- java source files
- AndroidManifest.xml
- jni
Note that we don't create jni directory for libosip and libexosip, their Android.mk is placed directly under libosip and libexosip directories. This is because they are dependent on by application modules. We don't need compile them directly, instead, the build system will build them automatically while building applications. In order to help build system find libosip and libexosip, we must set NDK_MODULE_PATH environment variable to the directory that directly containing libosip and libexosip. The build system will search for them based on directory name, so their names matter.
To port exosip to android, the essential task is to create the Android.mk file, which specifies source files, c flags, ld flags, dependent libraries. We define HAVE_TIME_H and HAVE_SYS_SELECT_H to compile exosip successfully. And we define ENABLE_TRACE and OSIP_MT to enable logging and multi-threading. In the last line, $(call import-module,libosip) tells the build system that exosip depends on osip, and all header files exported by osip (LOCAL_EXPORT_C_INCLUDES:=$(LOCAL_C_INCLUDES)) will be included by exosip automatically.
import-module is a feature that isn't available in the build system in android source tree. It enables us organizing our projects in arbitrary manner. For example, we can place libosip and libexosip directories in another directory. The build system can still find them as long as NDK_MODULE_PATH is set to the directory containing them. It's much more flexible than specifying dependency relationship with relative path.
Sample:
The sample for this post is available at:
http://code.google.com/p/rxwen-blog-stuff/source/browse/trunk/android/exosip_sample/
It shows how to:
- use ndk build system
- use stl in c++ code
- create a very basic exosip application
- call native code from java
- call java code from native code
ndk document
exosip user manual
Tuesday, December 14, 2010
tools for working with android jni
When we make use of jni on android, it's a error-prone task to manually write the native function name for a given java native function. Though there are rules for us to follow, no one would like to memorize that. javah to the rescue.
For example, for the following java class with a native method.
We can follow steps below to generate a native header file:
And we get a header file com_rmd_jni_Main.h with content below:
There are cases that we need to provide a method signature of a java function to the GetMethodID function in native code. javap can help us.
Consider the java class below, within which exists a JniCallback method. And this method is meant to be called from native code.
Reference:
Java Native Interface Programming
For example, for the following java class with a native method.
1 package com.rmd.jni;
2
3 import android.app.Activity;
4 import android.os.Bundle;
5
6 public class Main extends Activity
7 {
8 /** Called when the activity is first created. */
9 @Override
10 public void onCreate(Bundle savedInstanceState)
11 {
12 super.onCreate(savedInstanceState);
13 setContentView(R.layout.main);
14 }
15
16 public native boolean JniMethod(int a);
17 }
2
3 import android.app.Activity;
4 import android.os.Bundle;
5
6 public class Main extends Activity
7 {
8 /** Called when the activity is first created. */
9 @Override
10 public void onCreate(Bundle savedInstanceState)
11 {
12 super.onCreate(savedInstanceState);
13 setContentView(R.layout.main);
14 }
15
16 public native boolean JniMethod(int a);
17 }
We can follow steps below to generate a native header file:
- cd to project root folder
- Compile the project, e.g., using ant debug command
- run javah -jni -classpath bin/classes -d jni com.rmd.jni.Main (this command generates a native header file in jni directory, for com.rmd.jni.Main class)
And we get a header file com_rmd_jni_Main.h with content below:
1 /* DO NOT EDIT THIS FILE - it is machine generated */
2 #include <jni.h>
3 /* Header for class com_rmd_jni_Main */
4
5 #ifndef _Included_com_rmd_jni_Main
6 #define _Included_com_rmd_jni_Main
7 #ifdef __cplusplus
8 extern "C" {
9 #endif
10 /*
11 * Class: com_rmd_jni_Main
12 * Method: JniMethod
13 * Signature: (I)Z
14 */
15 JNIEXPORT jboolean JNICALL Java_com_rmd_jni_Main_JniMethod
16 (JNIEnv *, jobject, jint);
17
18 #ifdef __cplusplus
19 }
20 #endif
21 #endif
2 #include <jni.h>
3 /* Header for class com_rmd_jni_Main */
4
5 #ifndef _Included_com_rmd_jni_Main
6 #define _Included_com_rmd_jni_Main
7 #ifdef __cplusplus
8 extern "C" {
9 #endif
10 /*
11 * Class: com_rmd_jni_Main
12 * Method: JniMethod
13 * Signature: (I)Z
14 */
15 JNIEXPORT jboolean JNICALL Java_com_rmd_jni_Main_JniMethod
16 (JNIEnv *, jobject, jint);
17
18 #ifdef __cplusplus
19 }
20 #endif
21 #endif
There are cases that we need to provide a method signature of a java function to the GetMethodID function in native code. javap can help us.
Consider the java class below, within which exists a JniCallback method. And this method is meant to be called from native code.
1 package com.rmd.jni;
2
3 import android.app.Activity;
4 import android.os.Bundle;
5
6 public class Main extends Activity
7 {
8 /** Called when the activity is first created. */
9 @Override
10 public void onCreate(Bundle savedInstanceState)
11 {
12 super.onCreate(savedInstanceState);
13 setContentView(R.layout.main);
14 }
15
16 public boolean JniCallback(int a);
17 }
After it's compiled, we can use javap -classpath bin/classes -s -p com.rmd.jni.Main command to find out the signature of JniCallback method. Shown below.2
3 import android.app.Activity;
4 import android.os.Bundle;
5
6 public class Main extends Activity
7 {
8 /** Called when the activity is first created. */
9 @Override
10 public void onCreate(Bundle savedInstanceState)
11 {
12 super.onCreate(savedInstanceState);
13 setContentView(R.layout.main);
14 }
15
16 public boolean JniCallback(int a);
17 }
Compiled from "Main.java"
public class com.rmd.jni.Main extends android.app.Activity{
public com.rmd.jni.Main();
Signature: ()V
public void onCreate(android.os.Bundle);
Signature: (Landroid/os/Bundle;)V
public native boolean JniMethod(int);
Signature: (I)Z
}
public class com.rmd.jni.Main extends android.app.Activity{
public com.rmd.jni.Main();
Signature: ()V
public void onCreate(android.os.Bundle);
Signature: (Landroid/os/Bundle;)V
public native boolean JniMethod(int);
Signature: (I)Z
}
Reference:
Java Native Interface Programming
Wednesday, December 8, 2010
learning opencore through unit testing
Android 2.3 gingerbread was officially released. A big improvement is this version is in media framework, as stated in platform highlights:
I'm not able to find out what is the replacement for opencore yet. But before opencore is obsoleted, I still would like to share my way of learning opencore. This might be helpful for those who still have to work on legacy android platforms.
Opencore is a complicated multimedia framework. An effective way I thought a bit easier to learn it is looking at its unit testing code and debugging unit testing application. The advantages include:
How to debug opencore with gdb
Before we use gdb to debug unit testing application, we need to be aware of a helpful gdb feature: show real type of a object though pointer.
In opencore framework, it always manipulate a concrete object through an interface or base pointer. So, during debugging, we often get lost about what the actual type of the object being pointed to by the pointer is. Gdb can print the real type of object if the pointer points to it has virtual table. This feature can be turned on with "set print object" command.
For example, if we break at the line returns a pointer in PVPlayerNodeRegistry::CreateNode function, we issue "p nodeInterface" command without print object turning on, we see:
We can follow below steps to compile and debug unit testing application:
Media Framework
- New media framework fully replaces OpenCore, maintaining all previous codec/container support for encoding and decoding.
- Integrated support for the VP8 open video compression format and the WebM open container format
- Adds AAC encoding and AMR wideband encoding
I'm not able to find out what is the replacement for opencore yet. But before opencore is obsoleted, I still would like to share my way of learning opencore. This might be helpful for those who still have to work on legacy android platforms.
Opencore is a complicated multimedia framework. An effective way I thought a bit easier to learn it is looking at its unit testing code and debugging unit testing application. The advantages include:
- The code can be compiled as x86 executable, so we can run it on our pc directly, rather than on a android device or emulator.
- The application can be debugged with gdb
- Unit tests demonstrate the simplest usage of opencore. It's particularly useful for a fresh learner to get started.
- Test cases each have its own concentration, and is easier to follow.
How to debug opencore with gdb
Before we use gdb to debug unit testing application, we need to be aware of a helpful gdb feature: show real type of a object though pointer.
In opencore framework, it always manipulate a concrete object through an interface or base pointer. So, during debugging, we often get lost about what the actual type of the object being pointed to by the pointer is. Gdb can print the real type of object if the pointer points to it has virtual table. This feature can be turned on with "set print object" command.
For example, if we break at the line returns a pointer in PVPlayerNodeRegistry::CreateNode function, we issue "p nodeInterface" command without print object turning on, we see:
$1 = (class PVMFNodeInterface *) 0x83c65c0
The type of the pinter is shown as PVMFNodeInterface, which isn't very informative because is the base type. If we trun print object on and run the command again, we see:$2 = (PVMFMP4FFParserNode *) 0x83c65c0
The real type of the object is clearly printed. Very useful feature for debugging complex frameworks.We can follow below steps to compile and debug unit testing application:
- Compile the app by following instructions in quick_start.txt
- cd to {open_core_root}/build_config/opencore_dynamic/build/pe_test. We need to start debugging here, otherwise the application may fail to find necessary libraries and media files.
- export LD_LIBRARY_PATH=../installed_lib/linux
- gdb ../bin/linux/pvplayer_engine_test
- set desired breakpoints
- run -source test.mp4 -test 1 1. The source and test case number argument can be changed accordingly.
Sunday, December 5, 2010
python decorators
Decorator is a very expressive language feature in python. It helps developers to write cleaner, modular code that is easier to extend and maintain. It also helps implement AOP and decorator pattern in python.
Decorator syntax
To declare a decorator function, we can define a function that takes a another function as argument and returns a function. The usage of decorator is very simple, just add a line begins with '@' symbol and the name of the decorator before the function to be decorated.
The effect is when we call foo function, besides print "hello world" message, the message "decorator message" is also printed. That is, the decorator function extends foo function's behavior.
The code above is equivalent to:
Decorators can also accept arguments, as long as it returns a decorator function that takes a function as argument.
The example above is equivalent to :
A more practical example
Here is a more practical example. We create a tracable decorator which is a debugging utility. It will keep records of the number of times that a function decorated with it is invoked.
If we run the code, it will prints that foo1 function is called three times and foo2 function is called twice.
As the example showed, the code for implementing tracing is separated from business logic code contained within foo1 and foo2. The maintainability of the program is much higher than if the code for tracing is mixed with business logic code.
Summary
We got several benefits from decorator.
First, it helps achieve a better separation of business logic code and auxiliary code.
Second, it helps finding out where the auxiliary is used because decorator employs a very special syntax.
Third, we can extend or change our business logic without having to change existing code. New code can be implemented as a decorator.
References:
Charming Python: Decorators make magic easy
Decorators for Functions and Methods
PythonDecorators
Decorator syntax
To declare a decorator function, we can define a function that takes a another function as argument and returns a function. The usage of decorator is very simple, just add a line begins with '@' symbol and the name of the decorator before the function to be decorated.
1 def decorator(func):
2 def new_func():
3 print "decorator message"
4 func()
5 return new_func
6
7 @decorator
8 def foo():
9 print "hello world"
10
11 foo()
2 def new_func():
3 print "decorator message"
4 func()
5 return new_func
6
7 @decorator
8 def foo():
9 print "hello world"
10
11 foo()
The effect is when we call foo function, besides print "hello world" message, the message "decorator message" is also printed. That is, the decorator function extends foo function's behavior.
The code above is equivalent to:
1 def decorator(func):
2 def new_func():
3 print "decorator message"
4 func()
5 return new_func
6
7 def foo():
8 print "hello world"
9
10 foo = decorator(foo)
11 foo()
2 def new_func():
3 print "decorator message"
4 func()
5 return new_func
6
7 def foo():
8 print "hello world"
9
10 foo = decorator(foo)
11 foo()
Decorators can also accept arguments, as long as it returns a decorator function that takes a function as argument.
1 def decorator_with_arg(arg):
2 def decorator(func):
3 def new_func():
4 print arg
5 func()
6 return new_func
7 return decorator
8
9 @decorator_with_arg("arg for decorator")
10 def foo():
11 print "hello world"
12
13 foo()
2 def decorator(func):
3 def new_func():
4 print arg
5 func()
6 return new_func
7 return decorator
8
9 @decorator_with_arg("arg for decorator")
10 def foo():
11 print "hello world"
12
13 foo()
The example above is equivalent to :
1 def decorator_with_arg(arg):
2 def decorator(func):
3 def new_func():
4 print arg
5 func()
6 return new_func
7 return decorator
8
9 def foo():
10 print "hello world"
11
12 foo = decorator_with_arg("arg for decorator")(foo)
13 foo()
The decorator_with_arg function creates a closure, so that the arg argument can still be used after the decorator_with_arg returned. Since it's possible for a decorator to accept arguments, the decorator's behavior can changed based on the argument passed in. So it's possible to write more flexible code.2 def decorator(func):
3 def new_func():
4 print arg
5 func()
6 return new_func
7 return decorator
8
9 def foo():
10 print "hello world"
11
12 foo = decorator_with_arg("arg for decorator")(foo)
13 foo()
A more practical example
Here is a more practical example. We create a tracable decorator which is a debugging utility. It will keep records of the number of times that a function decorated with it is invoked.
1 trace_log = {}
2
3 def tracable(func):
4 def decorated_func(*arg, **kwarg):
5 if not trace_log.has_key(func.__name__):
6 trace_log[func.__name__] = 1
7 else:
8 trace_log[func.__name__] += 1
9 func(*arg, **kwarg)
10
11 return decorated_func
12
13 def print_trace_log():
14 for key, value in trace_log.items():
15 print "%s called %d times"%(key, value)
16
17 @tracable
18 def foo1():
19 print "foo1"
20
21 @tracable
22 def foo2(arg, kwd="keyword arg"):
23 print "foo2"
24 print arg
25 print kwd
26
27 @tracable
28 def foo3():
29 print "foo3"
30
31 foo1()
32 foo1()
33 foo1()
34 foo2(12)
35 foo2(13)
36
37 print_trace_log()
2
3 def tracable(func):
4 def decorated_func(*arg, **kwarg):
5 if not trace_log.has_key(func.__name__):
6 trace_log[func.__name__] = 1
7 else:
8 trace_log[func.__name__] += 1
9 func(*arg, **kwarg)
10
11 return decorated_func
12
13 def print_trace_log():
14 for key, value in trace_log.items():
15 print "%s called %d times"%(key, value)
16
17 @tracable
18 def foo1():
19 print "foo1"
20
21 @tracable
22 def foo2(arg, kwd="keyword arg"):
23 print "foo2"
24 print arg
25 print kwd
26
27 @tracable
28 def foo3():
29 print "foo3"
30
31 foo1()
32 foo1()
33 foo1()
34 foo2(12)
35 foo2(13)
36
37 print_trace_log()
If we run the code, it will prints that foo1 function is called three times and foo2 function is called twice.
As the example showed, the code for implementing tracing is separated from business logic code contained within foo1 and foo2. The maintainability of the program is much higher than if the code for tracing is mixed with business logic code.
Summary
We got several benefits from decorator.
First, it helps achieve a better separation of business logic code and auxiliary code.
Second, it helps finding out where the auxiliary is used because decorator employs a very special syntax.
Third, we can extend or change our business logic without having to change existing code. New code can be implemented as a decorator.
References:
Charming Python: Decorators make magic easy
Decorators for Functions and Methods
PythonDecorators
Saturday, December 4, 2010
install fcitx input method on ubuntu
The default scim input method doesn't work well with freemind on my computer, so I'd like to switch to fcitx. The fcitx package in ubuntu repository is an old version, and to install fcitx manually isn't very straightforward, so I make this post about how I managed to get it to work.
1. Download fcitx source code and extract.
2. Make sure all dependent libraries are installed:
4. At this time, fcitx failed to run and gave following error: fcitx: error while loading shared libraries: libfcitx-config.so.4: cannot open shared object file: No such file or directory. To fix it, create a symbol link in /usr/lib with this command:
"xim" "X Input Method" "gtk20" "/usr/share/locale" "ko:ja:th:zh"
to
"xim" "X Input Method" "gtk20" "/usr/share/locale" "en:ko:ja:th:zh"
7. Restart
To make fcitx more convenient to use, I run fcitx-config and change configurations below.
Reference:
fcitx4.pdf
1. Download fcitx source code and extract.
2. Make sure all dependent libraries are installed:
sudo apt-get install libpango1.0-dev libcairo2-dev xorg-dev libtool gettext intltool
3. Run configure && make && make install4. At this time, fcitx failed to run and gave following error: fcitx: error while loading shared libraries: libfcitx-config.so.4: cannot open shared object file: No such file or directory. To fix it, create a symbol link in /usr/lib with this command:
sudo ln -s /usr/local/lib/libfcitx-
5. Create /etc/X11/xinit/xinput.d/fcitx file with below content. Alternatively we can place them in ~/.profile.XIM=fcitx
XIM_PROGRAM=/usr/local/bin/fcitx
XIM_ARGS=""
GTK_IM_MODULE=XIM
QT_IM_MODULE=XIM
DEPENDS="fcitx"
6. Edit /usr/lib/gtk-2.0/2.10.0/XIM_PROGRAM=/usr/local/bin/fcitx
XIM_ARGS=""
GTK_IM_MODULE=XIM
QT_IM_MODULE=XIM
DEPENDS="fcitx"
"xim" "X Input Method" "gtk20" "/usr/share/locale" "ko:ja:th:zh"
to
"xim" "X Input Method" "gtk20" "/usr/share/locale" "en:ko:ja:th:zh"
7. Restart
To make fcitx more convenient to use, I run fcitx-config and change configurations below.
# Candidate Word Number
CandidateWordNumber=9
# Main Window Hide Mode
MainWindowHideMode=Auto
# Show Input Window After Trigger Input Mode
ShowInputWindowAfterTriggering=False
# Show Input Speed
ShowInputSpeed=False
CandidateWordNumber=9
# Main Window Hide Mode
MainWindowHideMode=Auto
# Show Input Window After Trigger Input Mode
ShowInputWindowAfterTriggering=False
# Show Input Speed
ShowInputSpeed=False
Reference:
fcitx4.pdf
Friday, November 26, 2010
update to latest metauml
The metauml package contained in the default texlive installation on ubuntu is the old version 0.2.3. This version doesn't support component diagram. I have to update to latest version manually. Here is how:
Now try the following diagram, it should compile fine.
- backup /usr/share/texmf-texlive/metapost/metauml
- download metauml here
- extract and copy everything under metauml/inputs to /usr/share/texmf-texlive/metapost/metauml
- run "sudo texhash" to refresh texmf database, so that new version will be recognized
Now try the following diagram, it should compile fine.
1 input metauml;
2 beginfig(1);
3
4 Component.C("ComponentAAA")();
5 drawObject(C);
6
7 endfig;
8 end
2 beginfig(1);
3
4 Component.C("ComponentAAA")();
5 drawObject(C);
6
7 endfig;
8 end
Tuesday, November 23, 2010
draw uml with latex&metauml
I've used and enjoyed the benefits of reversion control system for several years. RCS makes my life a lot easier. And it pushes me to highly prefer text format files over binary files, because text files can be managed by RCS more easily. metauml is a metapost library for creating uml diagrams, in text format.
Here are the steps to use it on ubuntu:
After all these tools have being installed, we can start our first uml diagram in latex.
Suppose we have following classes, and want to draw class diagram for them.
We create below metapost file, save it as class_diagram.mp, and use "mpost class_diagram.mp" command to generate a postscript file, class_diagram.1.
Then we create below tex file as a container document for the postscript. And use "pdflatex uml.tex" to generate the final pdf file.
A thing worth noticing is the latex document is of A4 size by default, which is not possible to contain a complex uml diagram. We can use "\paperwidth = 1024pt", "\paperheight = 1024pt", "\textheight = 800pt" command to create a document of arbitrary size. Here is more information about latex page layout.
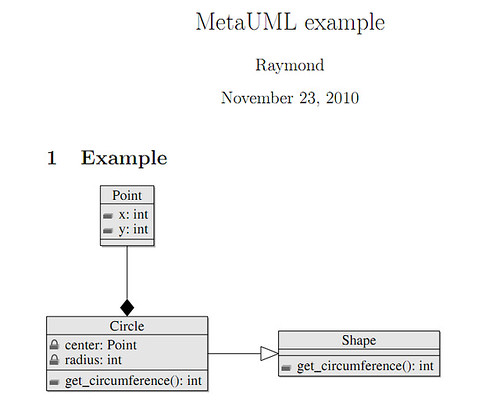
The final diagram is shown below:
The advantages of using tex file to draw uml diagram includes:
Here are the steps to use it on ubuntu:
- install texlive with: sudo apt-get install texlive
- install metauml containing in metapost for tex: sudo apt-get install texlive-metapost
After all these tools have being installed, we can start our first uml diagram in latex.
Suppose we have following classes, and want to draw class diagram for them.
1 class Point
2 {
3 public:
4 int x;
5 int y;
6 };
7
8 class Shape
9 {
10 public:
11 virtual int get_circumference() = 0;
12 virtual ~shape();
13 };
14
15 class Circle : public Shape
16 {
17 private:
18 Point center;
19 int radius;
20 public:
21 int get_circumference();
22 };
2 {
3 public:
4 int x;
5 int y;
6 };
7
8 class Shape
9 {
10 public:
11 virtual int get_circumference() = 0;
12 virtual ~shape();
13 };
14
15 class Circle : public Shape
16 {
17 private:
18 Point center;
19 int radius;
20 public:
21 int get_circumference();
22 };
We create below metapost file, save it as class_diagram.mp, and use "mpost class_diagram.mp" command to generate a postscript file, class_diagram.1.
1 input metauml;
2 beginfig(1);
3 %define classes
4 Class.Point("Point")("+x: int", "+y: int")();
5 Class.Shape("Shape")()("+get_circumference(): int");
6 Class.Circle("Circle")("-center: Point", "-radius: int")("+get_circumference(): int");
7
8 %layout classes
9 topToBottom(50)(Point, Circle);
10 leftToRight(50)(Circle, Shape);
11
12 %draw classes
13 drawObjects(Point, Shape, Circle);
14
15 %link classes
16 link(inheritance)(Circle.e -- Shape.w);
17 link(composition)(Point.s -- Circle.n);
18 endfig;
19 end
20
2 beginfig(1);
3 %define classes
4 Class.Point("Point")("+x: int", "+y: int")();
5 Class.Shape("Shape")()("+get_circumference(): int");
6 Class.Circle("Circle")("-center: Point", "-radius: int")("+get_circumference(): int");
7
8 %layout classes
9 topToBottom(50)(Point, Circle);
10 leftToRight(50)(Circle, Shape);
11
12 %draw classes
13 drawObjects(Point, Shape, Circle);
14
15 %link classes
16 link(inheritance)(Circle.e -- Shape.w);
17 link(composition)(Point.s -- Circle.n);
18 endfig;
19 end
20
Then we create below tex file as a container document for the postscript. And use "pdflatex uml.tex" to generate the final pdf file.
1 \documentclass{article}
2
3 % The following is needed in order to make the code compatible
4 % with both latex/dvips and pdflatex.
5 \ifx\pdftexversion\undefined
6 \usepackage[dvips]{graphicx}
7 \else
8 \usepackage[pdftex]{graphicx}
9 \DeclareGraphicsRule{*}{mps}{*}{}
10 \fi
11
12 \title{MetaUML example}
13 \author{Raymond Wen}
14
15 \begin{document}
16
17 \maketitle
18
19 \section{Example}
20 \includegraphics{class_diagram.1}
21
22 \end{document}
2
3 % The following is needed in order to make the code compatible
4 % with both latex/dvips and pdflatex.
5 \ifx\pdftexversion\undefined
6 \usepackage[dvips]{graphicx}
7 \else
8 \usepackage[pdftex]{graphicx}
9 \DeclareGraphicsRule{*}{mps}{*}{}
10 \fi
11
12 \title{MetaUML example}
13 \author{Raymond Wen}
14
15 \begin{document}
16
17 \maketitle
18
19 \section{Example}
20 \includegraphics{class_diagram.1}
21
22 \end{document}
A thing worth noticing is the latex document is of A4 size by default, which is not possible to contain a complex uml diagram. We can use "\paperwidth = 1024pt", "\paperheight = 1024pt", "\textheight = 800pt" command to create a document of arbitrary size. Here is more information about latex page layout.
The final diagram is shown below:
The advantages of using tex file to draw uml diagram includes:
- We can concentrate on the content of the uml, rather than its layout
- The diagram can be easily version controlled and compared
- It's easier to make modifications
- It's totally free
- The output file format can be easily changed
- It's possible to use/write tools to generate uml diagram automatically
Monday, November 15, 2010
avoid memory leak in osip
I was debugging memory leak bugs recently. The bug was caused by incorrect usage of the osip library. It's not uncommon that we meet problems when we rely on a library or framework that we don't fully understand.
Symptom and debugging
The symptom is our application ran more and more slowly, and eventually crashed. This seemed very likely to be caused by resource leak. And after ran performance monitor against our application, it's further confirmed that memory was leaking. The virtual bytes, private bytes of the process was continuously increasing.
With the help of umdh.exe, we can find out exact lines of code that were leaking memory. It showed all stack traces of currently allocated memory blocks (including blocks that were either being used or leaked, so we must identify which blocks were in use and which were not) at the moment of dumping.
Causes
The causes of the memory leak is mainly caused by not understanding below items well.
The first thought I had is to call osip_transaction_free inside the kill_transaction callback, but it was wrong. Because the transaction is still accessed after the kill_transaction callback returned. So, a possible point to free transactions is to do it at the end of an iteration of the main loop, after all events have been handled.
I just don't get why this important point isn't mentioned in the official document.
Such inconsistency makes it extremely easy to get confused and write code that either crashes or leaks.
Symptom and debugging
The symptom is our application ran more and more slowly, and eventually crashed. This seemed very likely to be caused by resource leak. And after ran performance monitor against our application, it's further confirmed that memory was leaking. The virtual bytes, private bytes of the process was continuously increasing.
With the help of umdh.exe, we can find out exact lines of code that were leaking memory. It showed all stack traces of currently allocated memory blocks (including blocks that were either being used or leaked, so we must identify which blocks were in use and which were not) at the moment of dumping.
Causes
The causes of the memory leak is mainly caused by not understanding below items well.
- transaction isn't destroyed automatically
The first thought I had is to call osip_transaction_free inside the kill_transaction callback, but it was wrong. Because the transaction is still accessed after the kill_transaction callback returned. So, a possible point to free transactions is to do it at the end of an iteration of the main loop, after all events have been handled.
I just don't get why this important point isn't mentioned in the official document.
- inconsistent resource management model
Such inconsistency makes it extremely easy to get confused and write code that either crashes or leaks.
Wednesday, October 20, 2010
blogporter v1.0.0 released
The first version of blogporter is released. It's a utility for synchronizing posts between different blog service provider.
I wrote this tool because I need to maintain two blogs. It's annoying to have to copy and paste my posts to another blog. And the main reason I have two blogs is that blogger's service is not available in china mainland, due to a well-known reason. But I don't want to give up blogger's tight integration with my gmail account. So, I mainly write blogs here, and then use blog-porter to synchronize the other blog with this one.
Refer to http://code.google.com/p/blog-porter/ for more information about this utility.
The immediate usage of this tool is to sync posts from LiveSpace blog to other blog sites, because LiveSpace blog is soon to be closed. To do this, you can:
This tool still has limitations, mainly includes:
I finally choose livespace backup file to implement LiveSpaceProvider, hope this doesn't bother too much.
I wrote this tool because I need to maintain two blogs. It's annoying to have to copy and paste my posts to another blog. And the main reason I have two blogs is that blogger's service is not available in china mainland, due to a well-known reason. But I don't want to give up blogger's tight integration with my gmail account. So, I mainly write blogs here, and then use blog-porter to synchronize the other blog with this one.
Refer to http://code.google.com/p/blog-porter/ for more information about this utility.
The immediate usage of this tool is to sync posts from LiveSpace blog to other blog sites, because LiveSpace blog is soon to be closed. To do this, you can:
- download LiveSpace blog data through http://{your_name}.spaces.live.com/Migration/Default.aspx
- extract the downloaded zip file
- install python, and BeatuifulSoup module
- run "python blogporter.py --list-blogs" to find out supported blog provider
- run "python blogporter.py --src-type=4 -p{path_to_unzipped_folder} --dst-type={number_stand_for_dst_blog_type} --dst-account={dst_blog_account} --dst-password={dst_blog_password} --startdate=2000-01-01 --enddate=2010-12-31 -v"
This tool still has limitations, mainly includes:
- it doesn't sync comments
- it doesn't sync category information from LiveSpace
- metaweblog api, it's limited to retrieve 20 posts at most.
- rss, it returns even less posts than metaweblog api. May be Google Reader API can helps us get more data through rss, since google cached a lot of historical rss data on their own server.
- livespace backup file, it doesn't contain category information.
I finally choose livespace backup file to implement LiveSpaceProvider, hope this doesn't bother too much.
Saturday, October 16, 2010
nook vs kindle 3
I finally had a chance to play with kindle 3, and compared it with my nook.

Pros:
Cons:
Pros:
- The greatest advantage I felt that kindle 3 is over nook is its speed. It's extremely fast to turn pages, at least twice faster than nook.
- The second point that kindle 3 is totally over nook is its power sustainability, on which nook performs very poor. Kindle is said to be able to work for at least half a month in one charge, but my nook only can work slightly longer than half a week.
- Kindle wins nook on size and weight as well. Though the screen size of them are the same, kindle is thinner and lighter than nook. Based on my feeling, kindle only weighs half nook's weight.
- The display of kindle 3 is a little bit better. It's whiter. And its contrast is higher, so that the text is clearer and easier to read. But the difference is slight, you might not notice it if you don't have them on hand at the same time to compare.
Cons:
- Kindle doesn't support epub format, which is a popular format with a lot of resources on the web.
- Kindle doesn't handle pdf format as well as nook does. I opened the same pdf book on both devices, nook can wisely cut white margins of the pdf to make full use of its screen. Nook can also layout the content correctly when I chose to use a larger font. Kindle doesn't change the layout, it can only zoom into the page, which means I have to scroll the page rather than turning page to see more. But kindle support two viewport, landscape and portrait, this feature gains some point for it.
- Nook is based on android, and you may extend its capability by installing new software. Thanks to nookdevs.
Subscribe to:
Posts (Atom)